Using EEM Central
What browsers does EEM Central support?
We support the current and the previous release of Chrome, Firefox and Safari. Each time a new browser version is released, we begin supporting that version and stop supporting the third most recent version. We also support Internet Explorer 11+ (for Windows 8 and previous versions), and Microsoft Edge (for Windows 10+).
Does EEM Central work on mobile devices?
EEM Central utilizes the Matrix Learning Management System (LMS). Yes, you can download their mobile app for iOS, their mobile app for Android, and their mobile app for Windows to enjoy using EEM Central anytime, anywhere. They also support all browsers on Android 5.1+, iOS 8+ and Windows 10. Their system has a responsive design so it will adapt to the size of your device's browser.
Watch this quick video on our EEM Central YouTube Channel
Or
Follow these simple steps:
- Go to https://www.eemcentral.com.
- Click the Login button in the top right hand corner of the page.
- Login with the username and password provided to you in an email from EEM Central.
- If you can not find your email or forgot your password, please enter your username (email address) and click Forgot Password? and the system will send you a link to create a new password.
- If you need any assistance, please email us at [email protected].
We have created an introductory video for you on how to navigate EEM Central. You can view it here.
Or
EEM Central operates on the Matrix Learning Management System (LMS) and you can access and download their learners quick start guide here (You must login to EEM Central to access the document).
Note: If you are using a mobile device, this page is best viewed in horizontal mode.
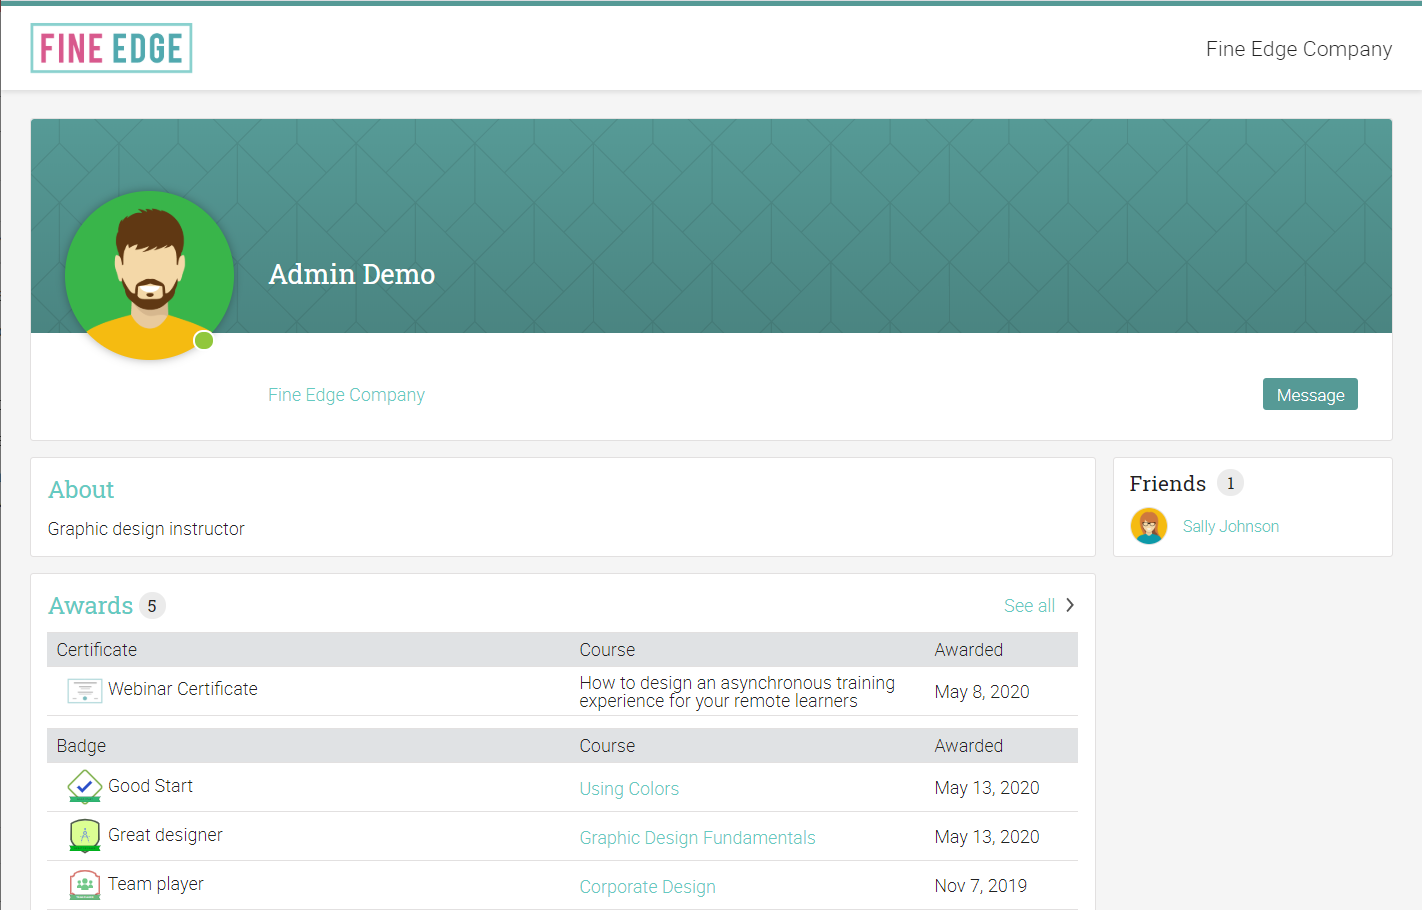
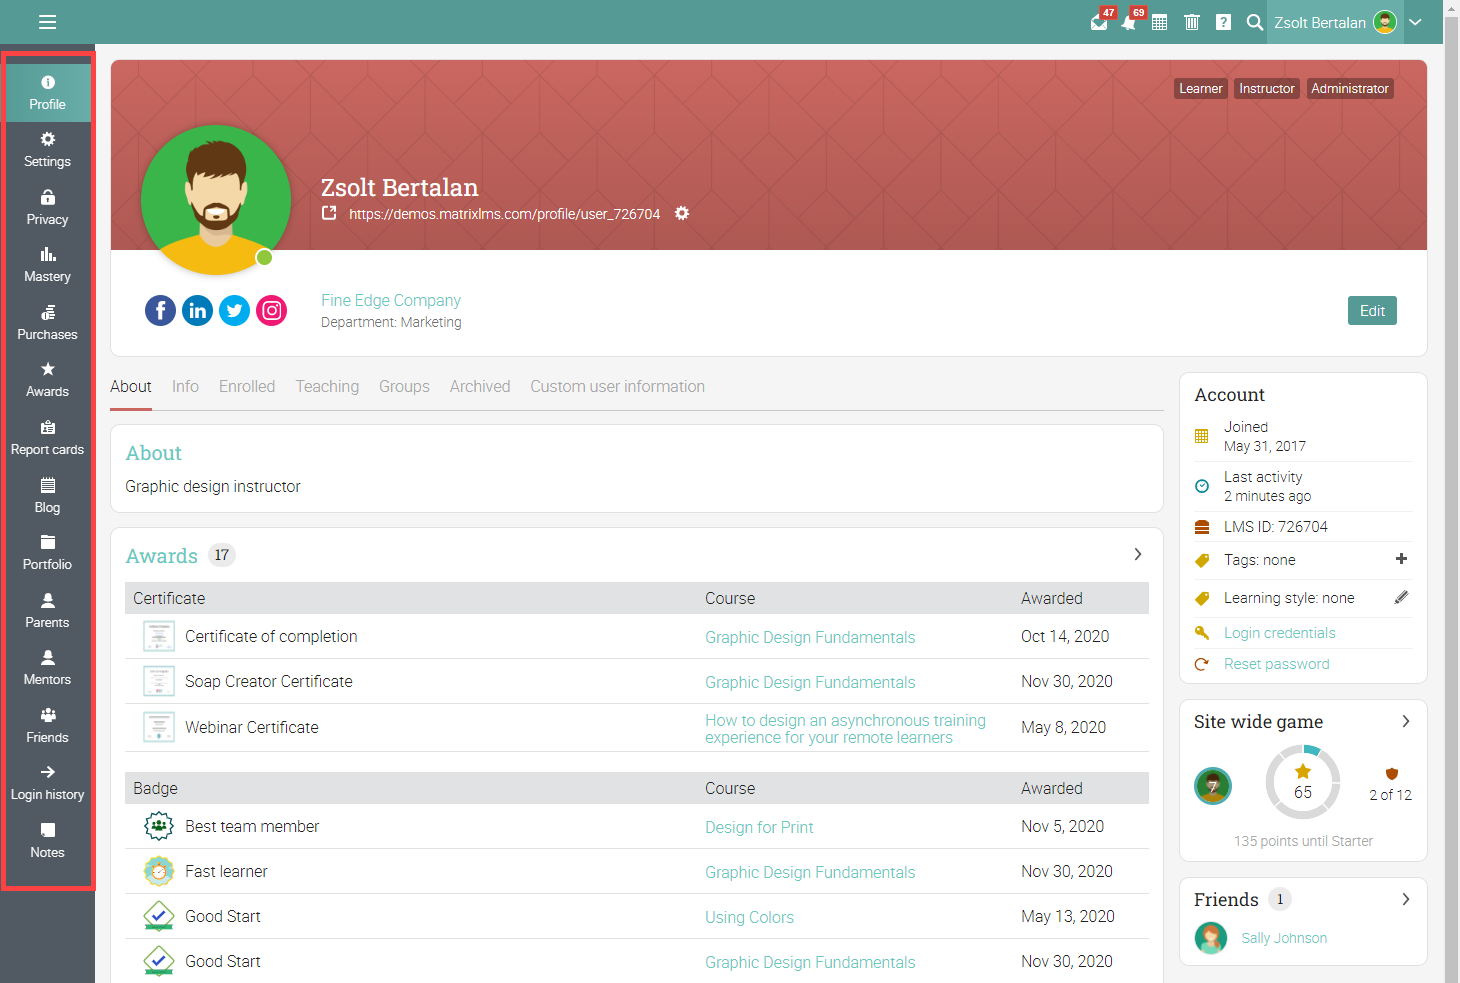
Overview
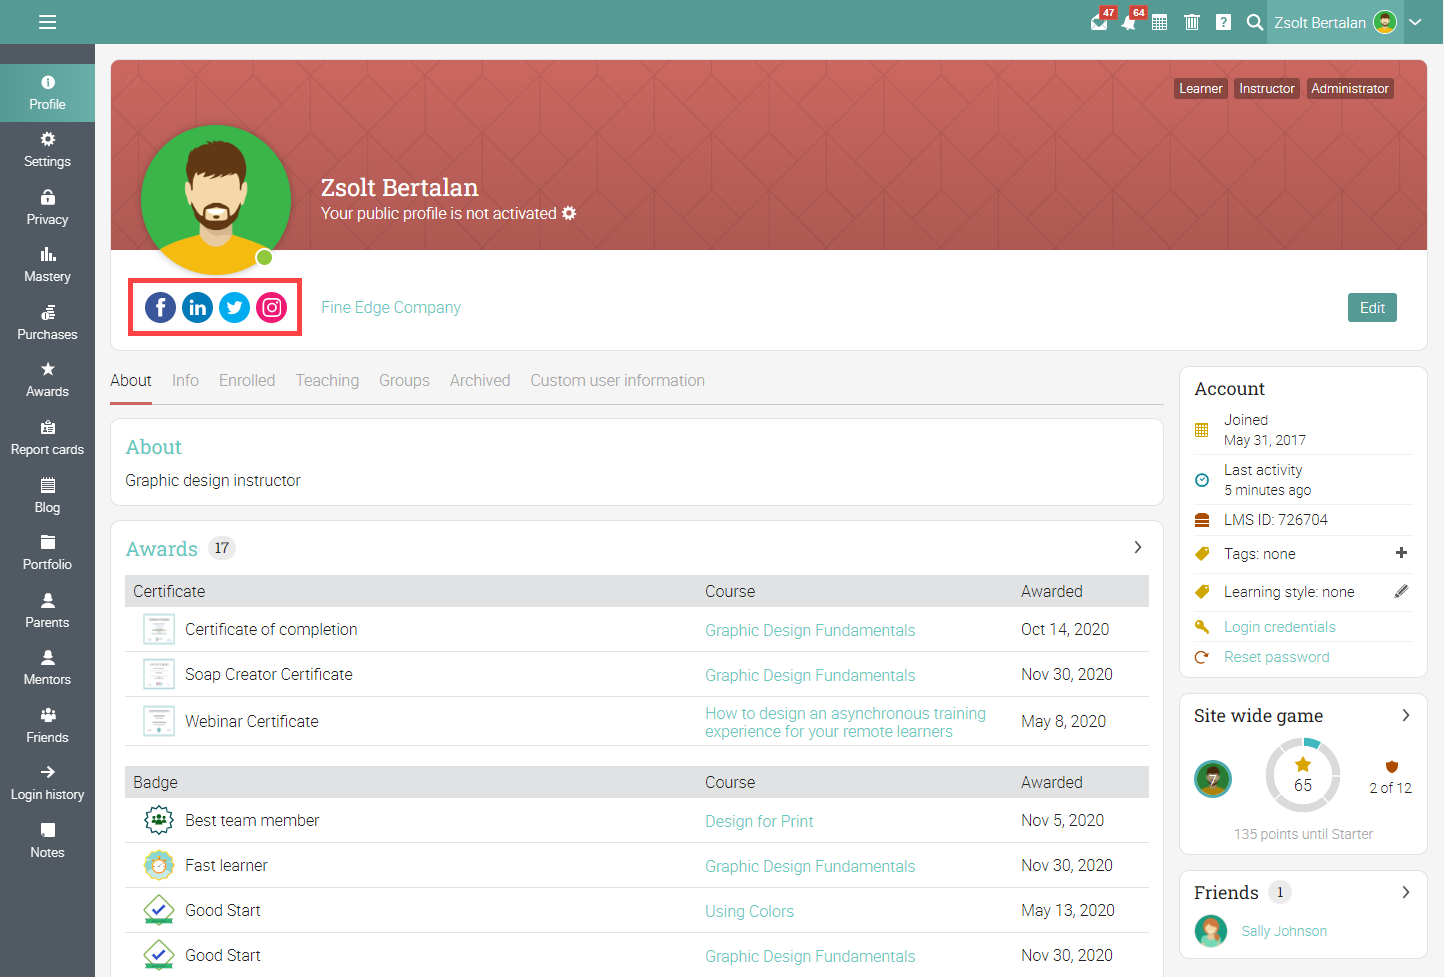
Every user has a profile page that includes various information such as their basic info, their account details, their friends, photos, social media links, and more. Users can have access to different profile information depending on the user type. For example, learners can see the courses they are enrolled in and instructors can see on the learners' profile pages the progress of learners on each course. The information that is visible depends on your account type and your portal's security settings.
.png?lmsauth=a01c9f325dce37c4e1747c50df8f10a68652bfc1)
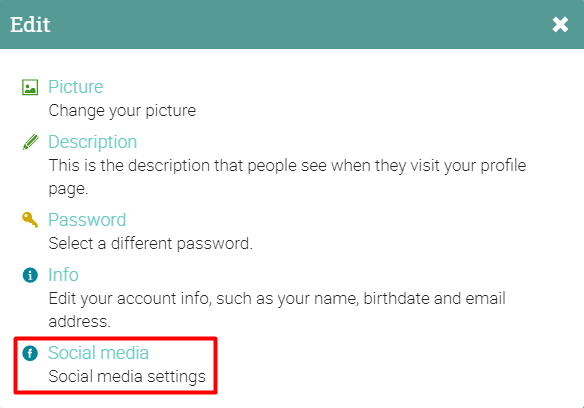
Editing profile information
Users can change their profile information by clicking the Edit button on their profile page. Note that administrators can select the "Disable profile edit" option via Admin/Policies preventing all your users (except admins) from editing user profile pages.
.png?lmsauth=a804af8d036a733e0b726d0cc3eb7da535571ce1)
Here users can edit their picture, profile description, password, account info, and they can add their social media IDs.
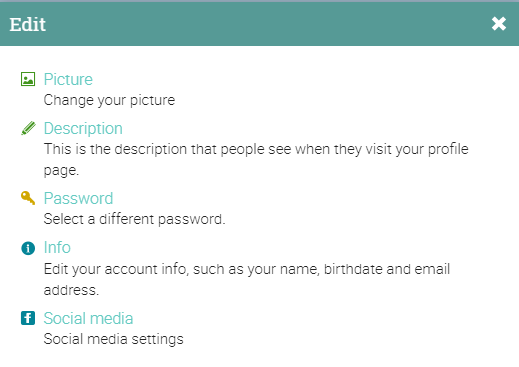
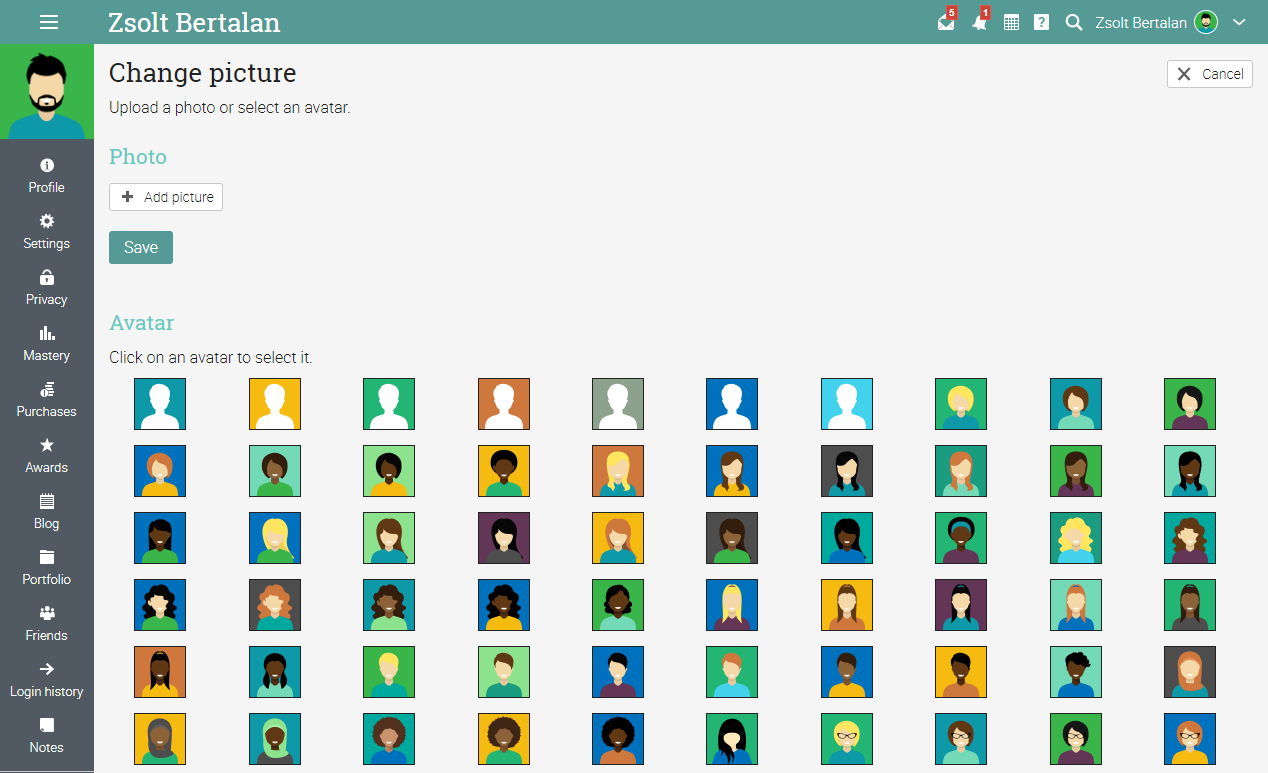
To edit the profile picture click the Picture link. Here users have two options, they can upload a picture, or they can choose one from the available avatars. Note that if the administrator enabled the "Show all avatars regardless of gender", users can choose avatars regardless of their gender.
To edit the profile description, click on the Description link. Enter the description, then click Save.

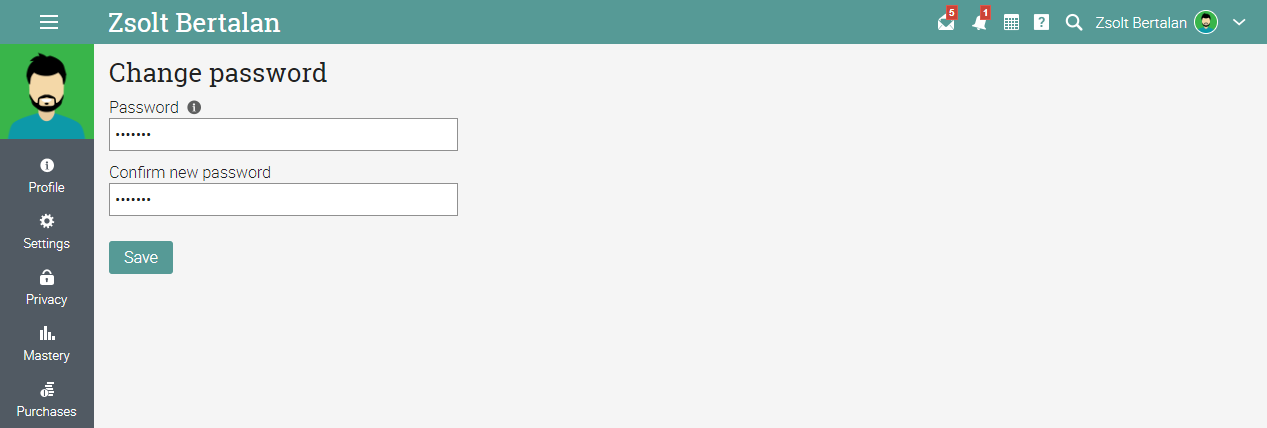
To change the password, click on the Password link. Enter the new password, then confirm the password and click Save.
To edit the profile information, click on the Info link. Here you can change the Name, the Login and Contact details, the Basic information, and more. After changing the profile information, click Save.
.png?lmsauth=841a7d500c0020ec403314b5333e194099f5ad90)
To edit your social media links, click on "Social Media".
We support Twitter, Facebook, LinkedIn, and Instagram links. Enter your social media IDs for each platform you are on, and you want to display them on your profile. Please note that you have to enter your ID, NOT the entire URL. For example, in the case of Facebook, if the URL is "https://www.facebook.com/sally.johnson.12" you only have to insert your ID, which is at the end of the URL "sally.johnson.12".
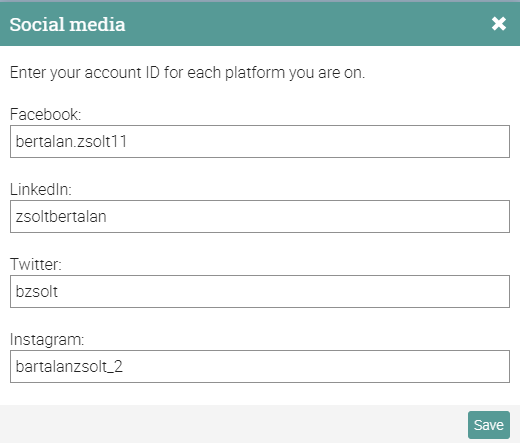
If you enter the IDs of your social media pages, their links will be displayed on your profile overview page. Please note that a social media link will only be displayed if you enter an ID.
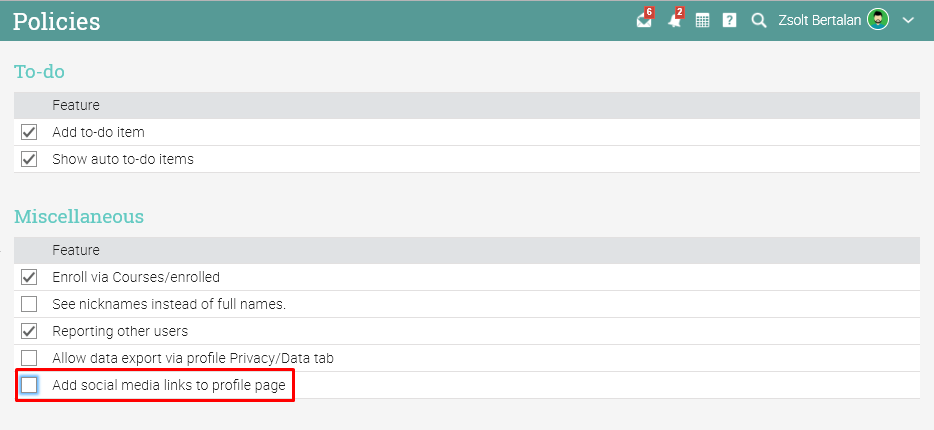
Administrators can prevent learners from adding social media icons to their profiles by unchecking the "Add social media links to profile page" option via Admin/Policies/Learners.
Administrators can customize the profile background pattern and color via Admin/Portal/Themes.
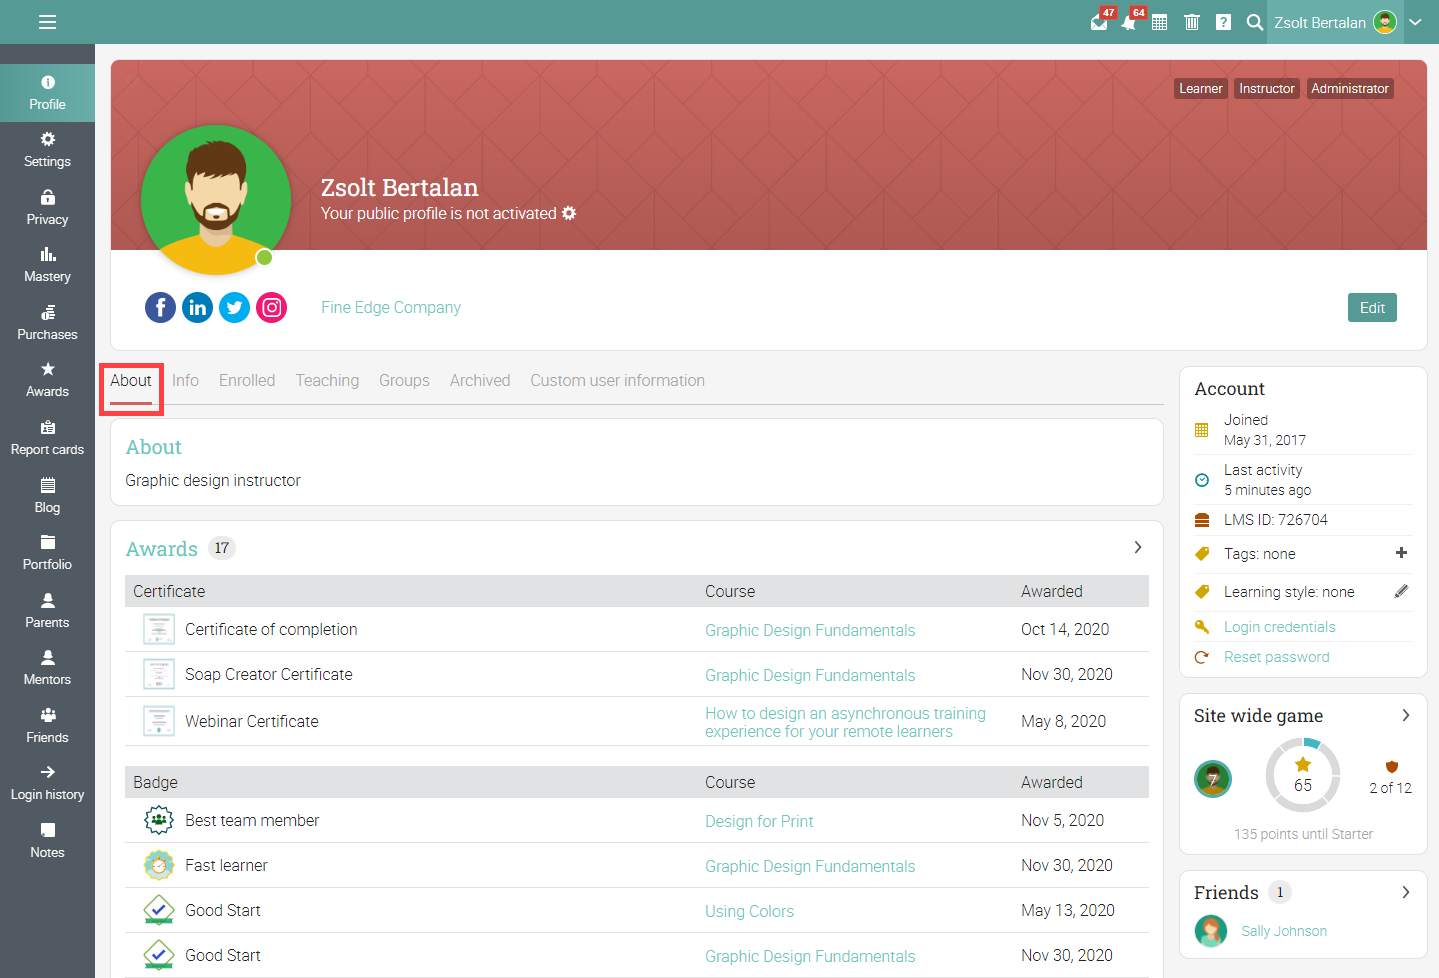
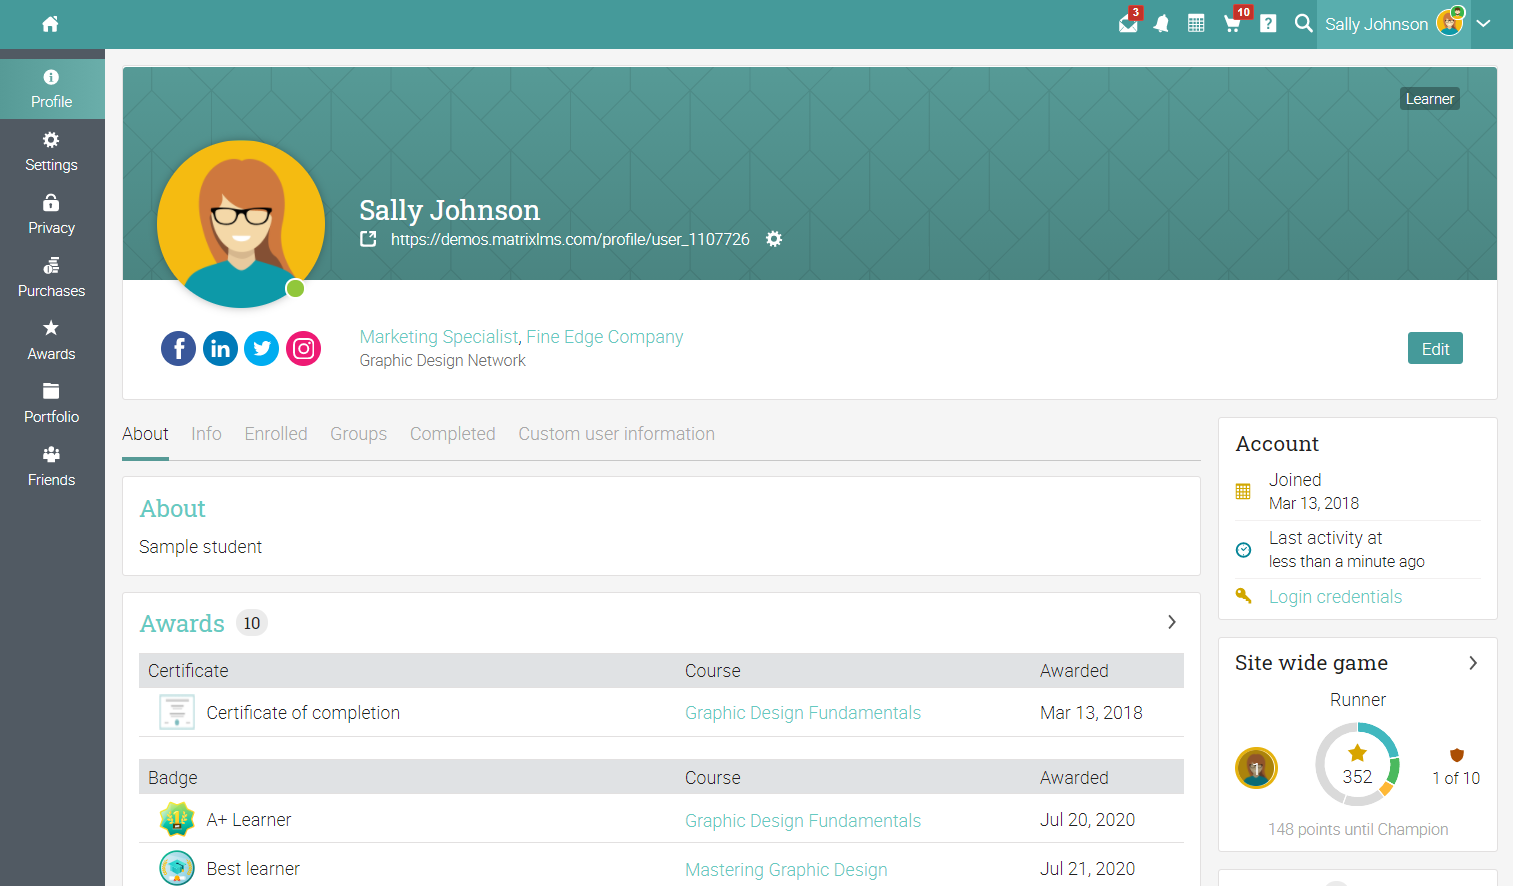
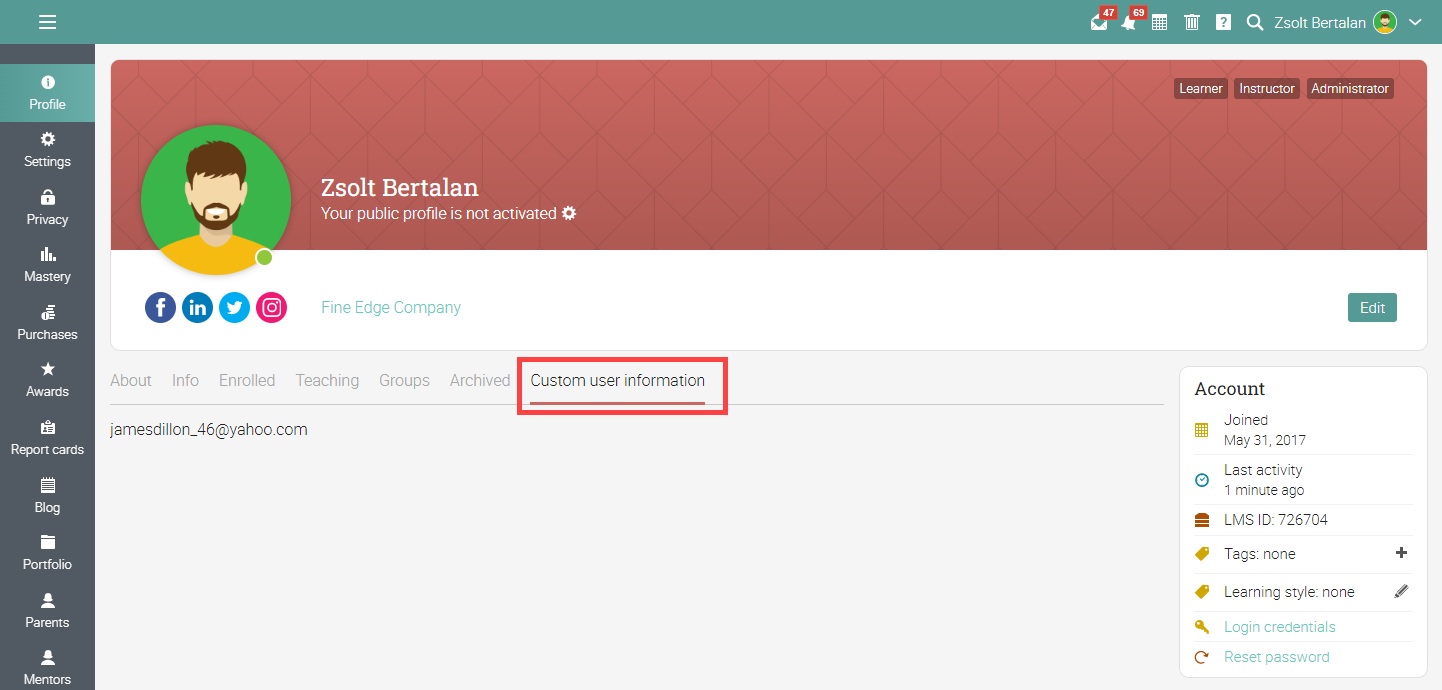
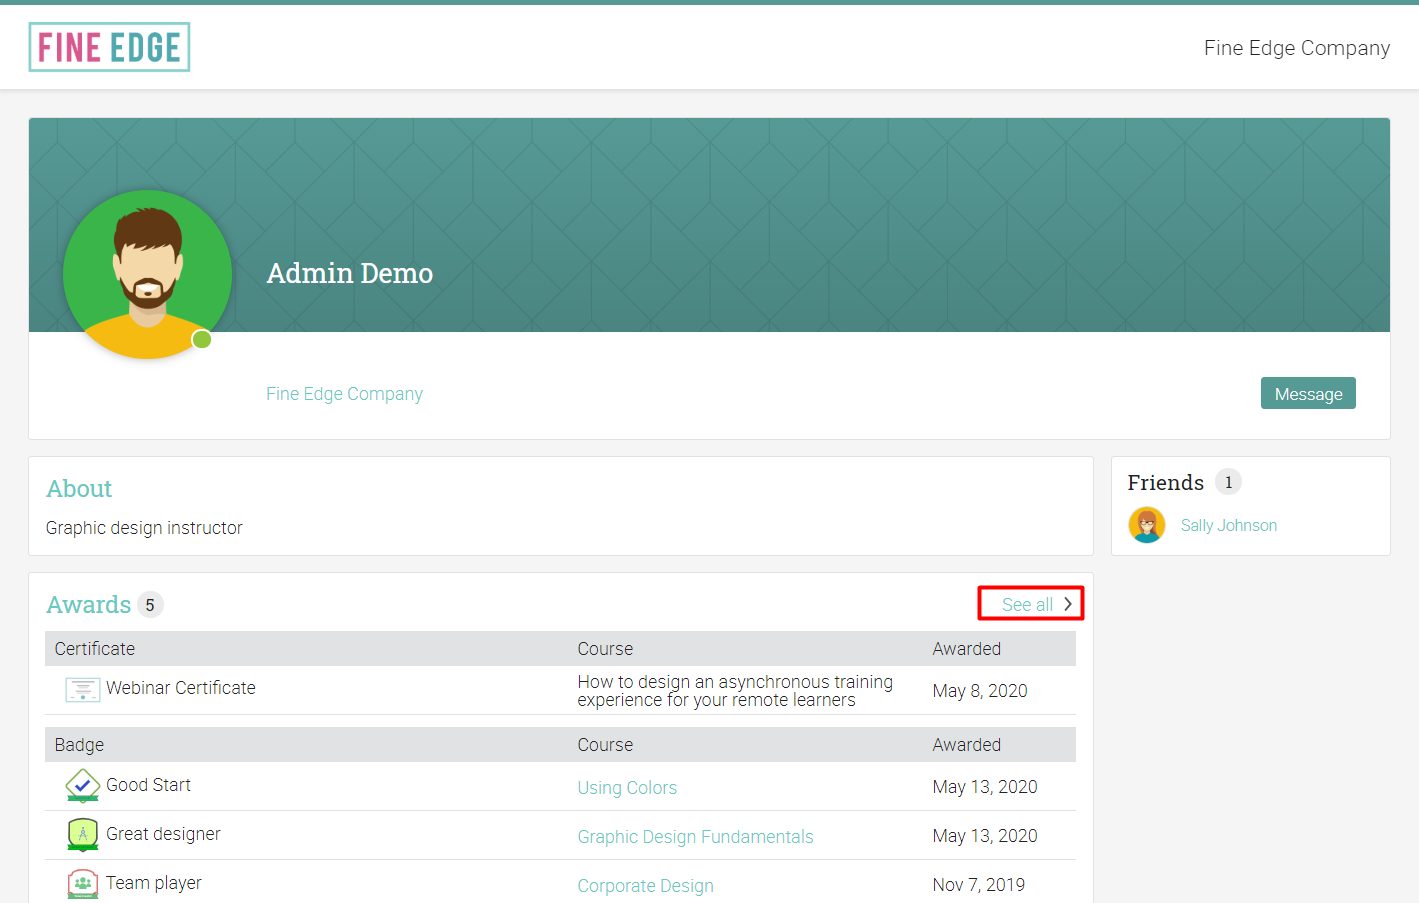
About tab
In the About tab, users can see their profile description and the Awards they've received, such as certificates and badges.
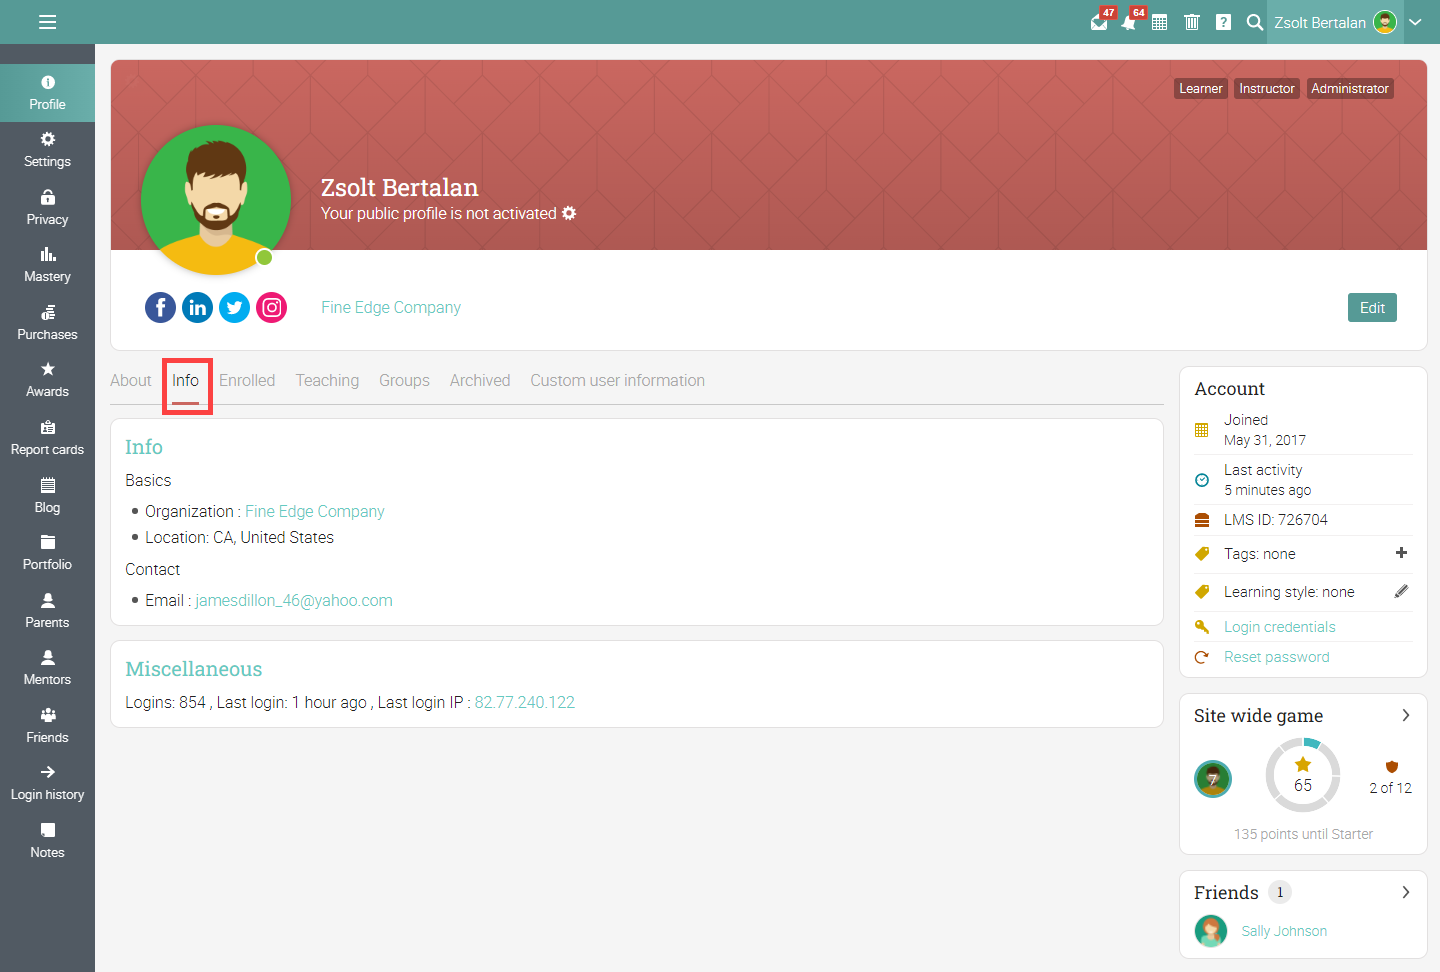
Info tab
In the Info tab, users can see their profile description, login details, and their basic information. To edit this information, users can click the Edit button.
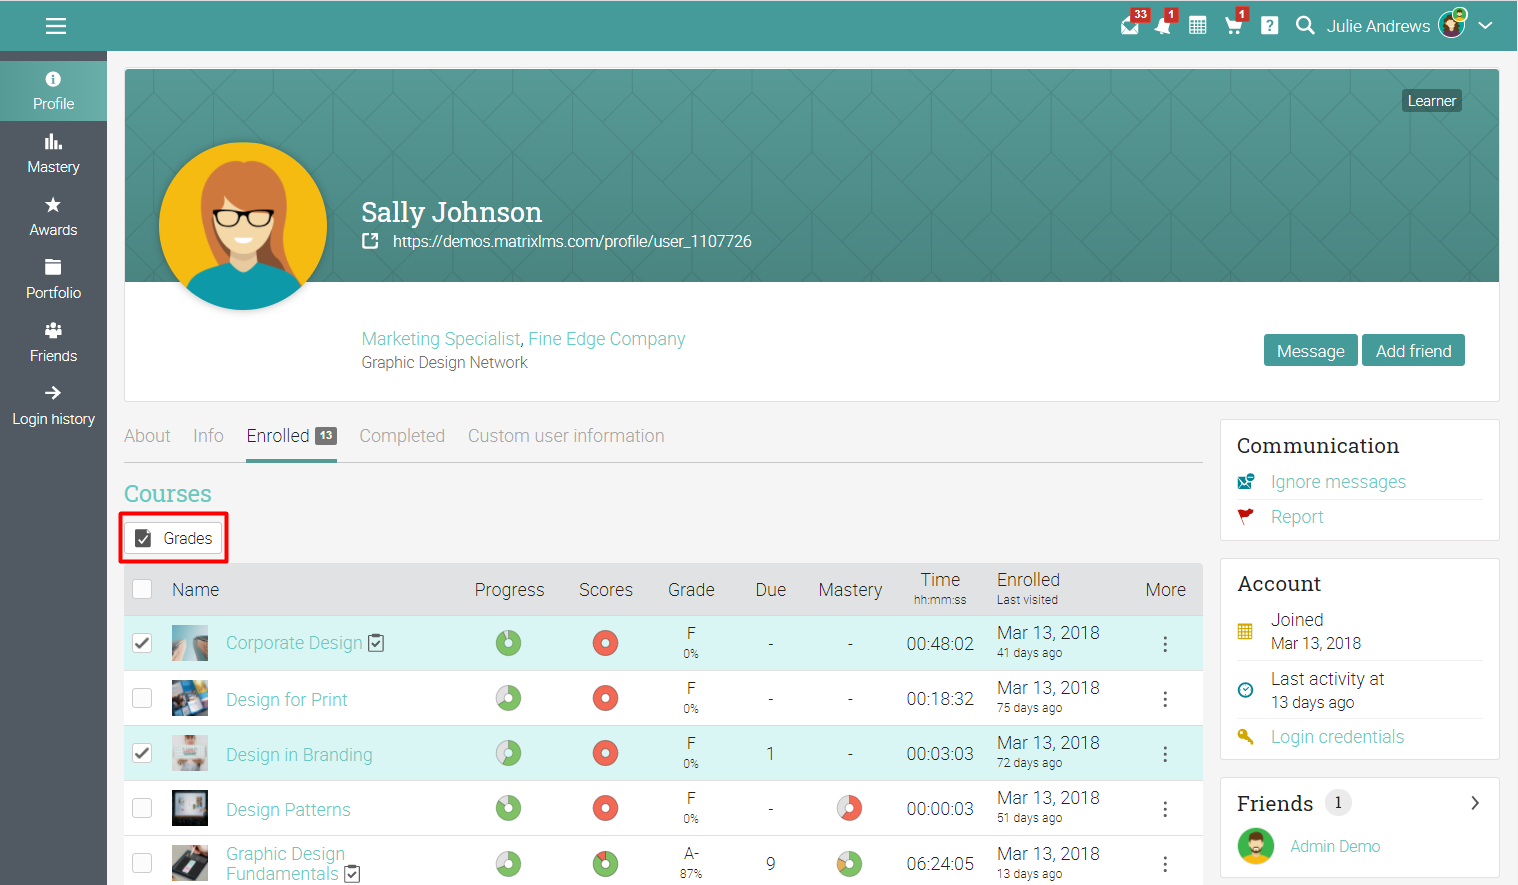
Enrolled tab
In the Enrolled tab, users can find information about the courses and paths they are enrolled in and information about their compliance status if they have courses that are required for compliance. The information displayed depends on the account type. The way that learners see other people's profiles and their own is different from the information that instructors and administrators see on profiles.
Administrator view
Administrators can see on learner profiles the progress, grades, time spent on courses, and mastery for the courses learners are enrolled in, and more. Administrators also have the possibility to unenroll learners from their courses, delete, edit accounts, and more.
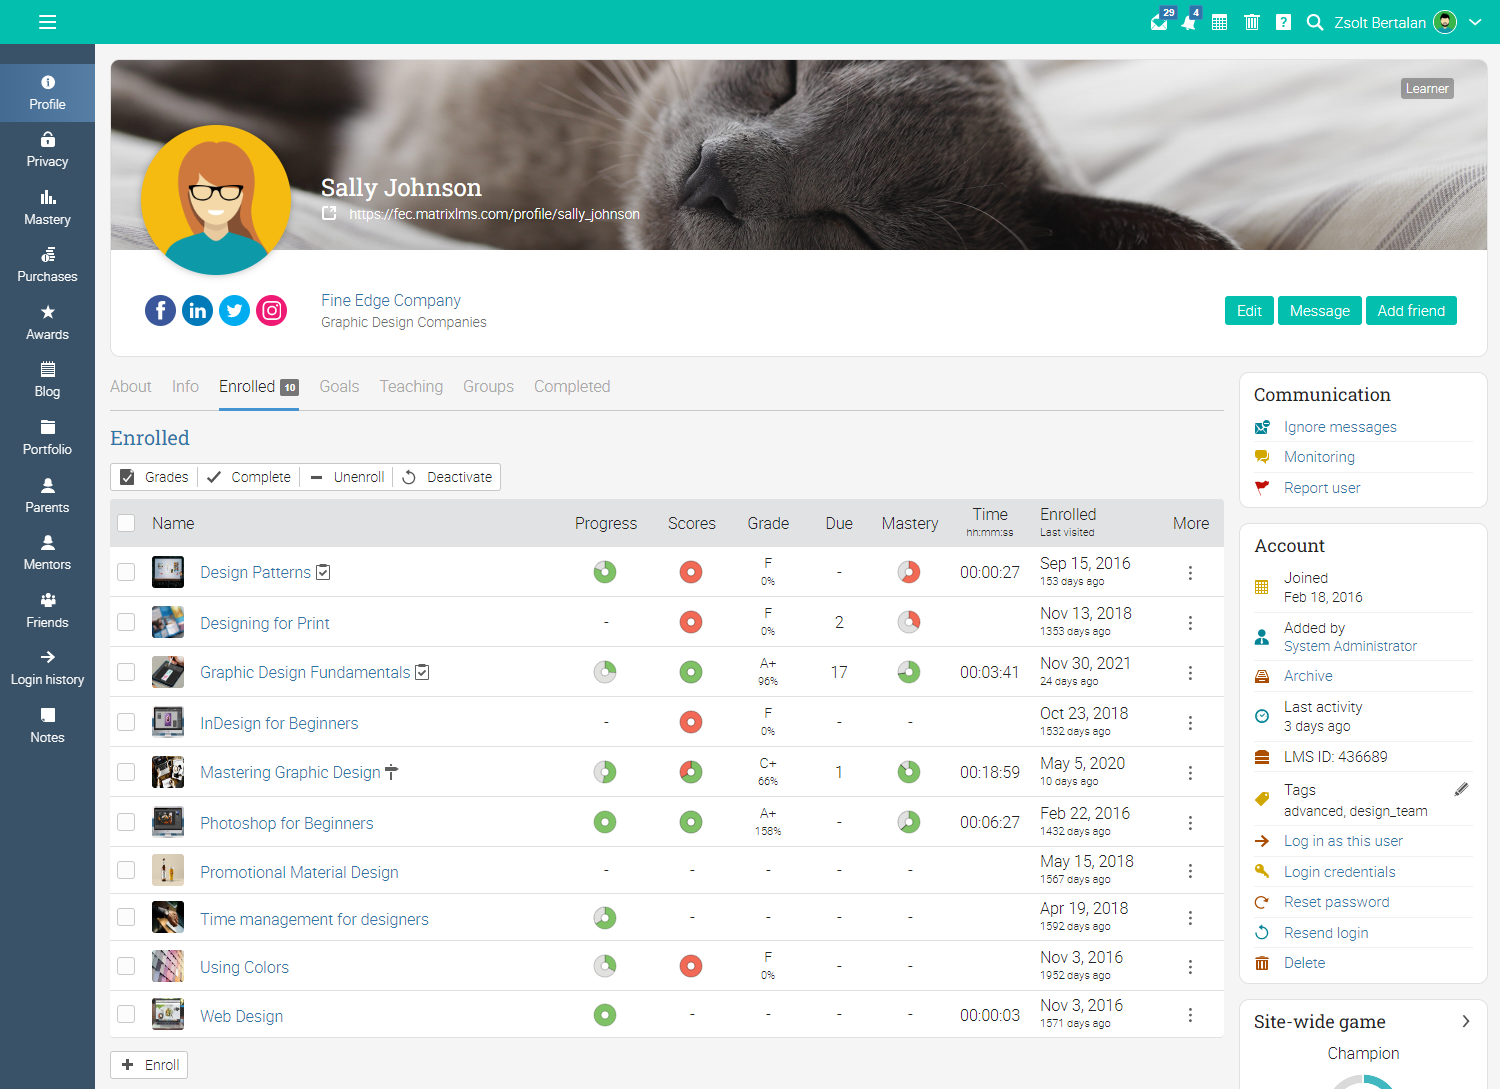
Administrators can enroll users into courses and learning paths via their profile page.

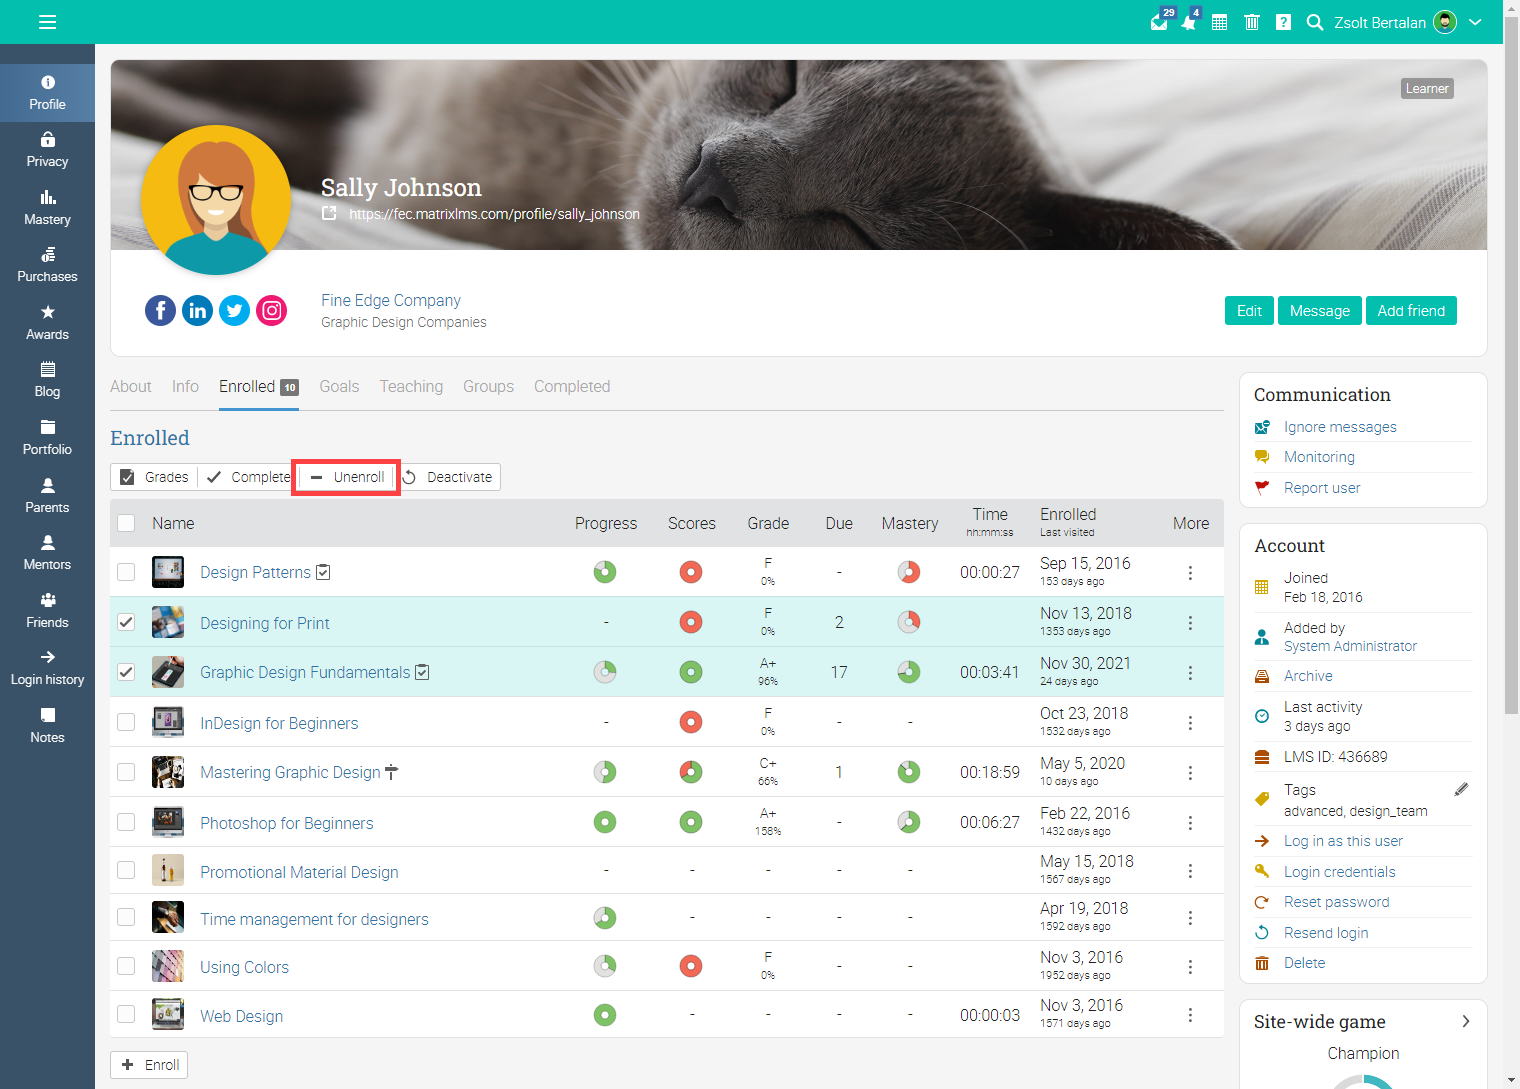
They can also unenroll learners from courses by selecting the courses and clicking the Unenroll button.
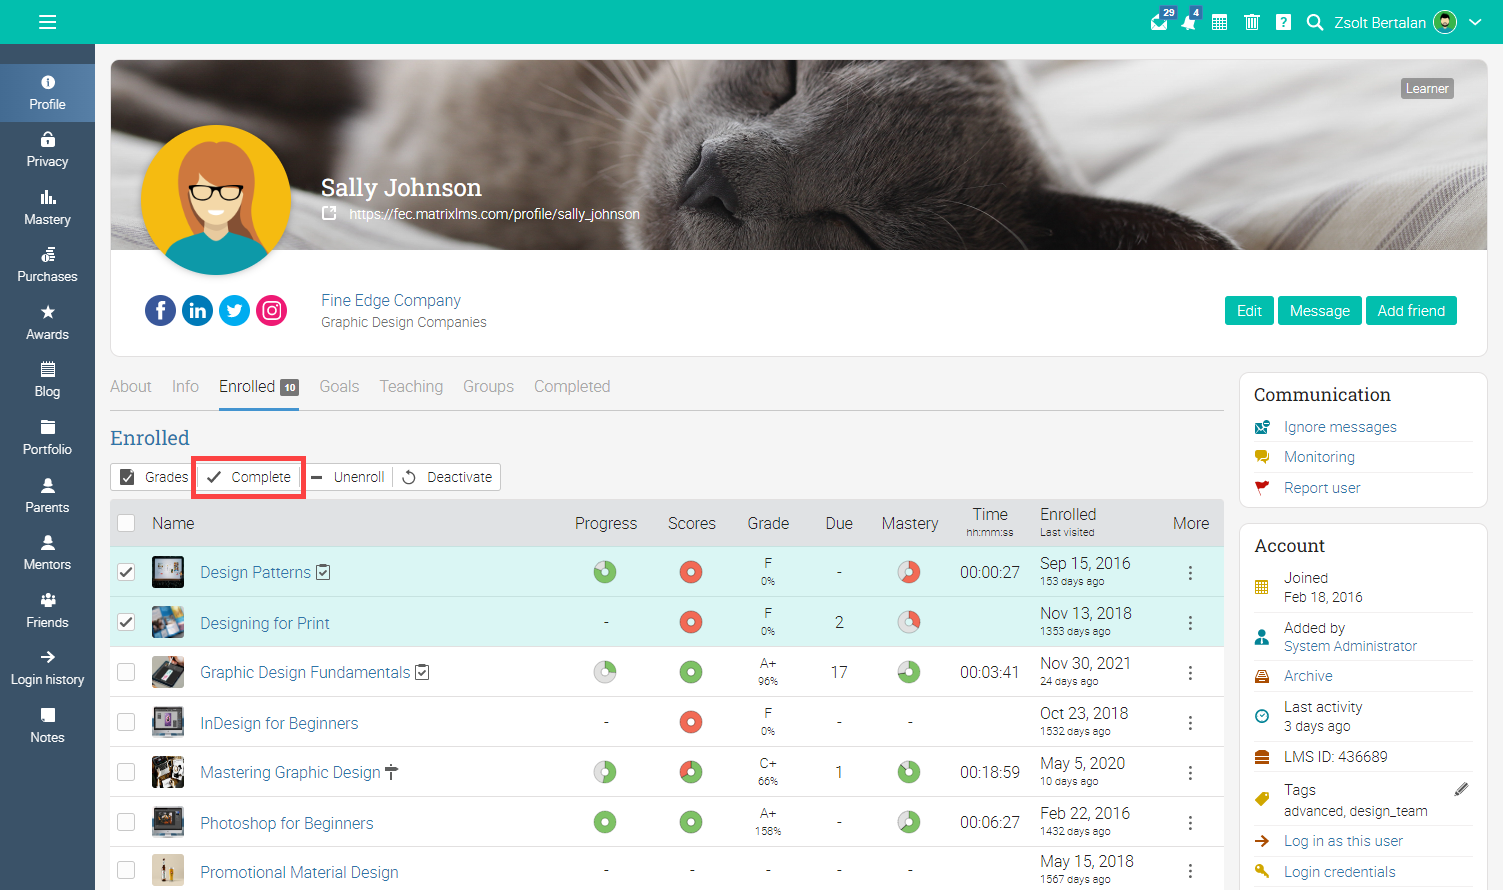
In the Enrolled tab, administrators also can mark courses and learning paths as complete by selecting them and clicking Complete.
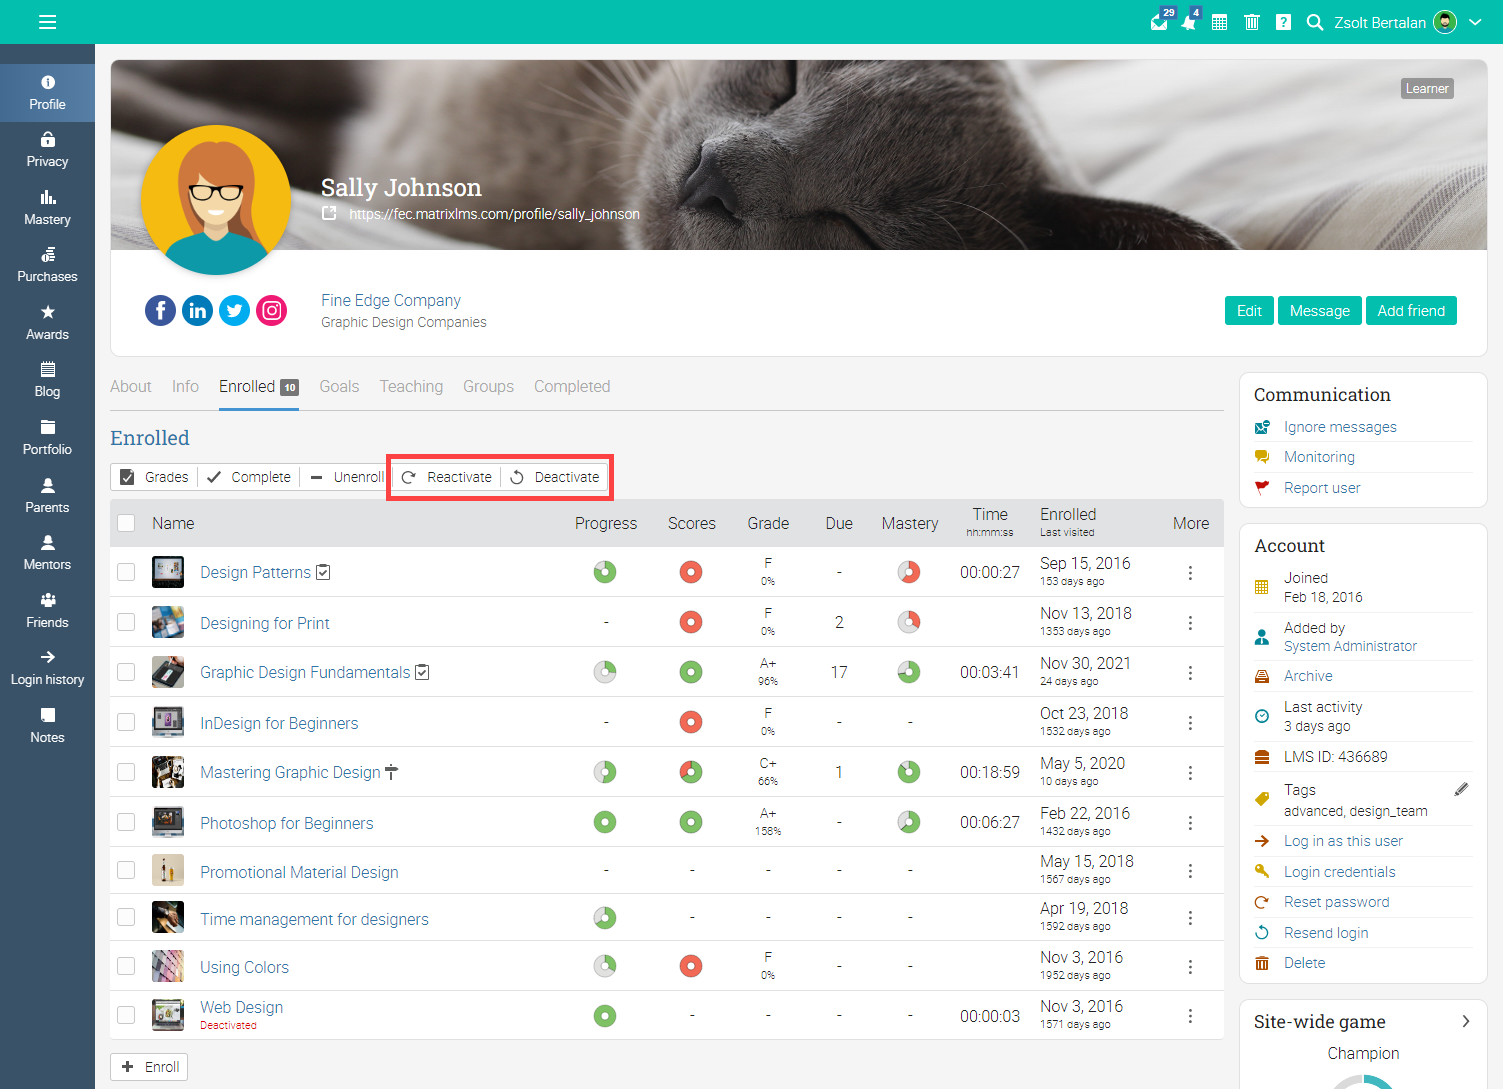
Administrators have the possibility to deactivate/reactivate users from their courses directly from the Enrolled tab of their profile page by selecting the course(s) and then clicking the Reactivate or Deactivate buttons.
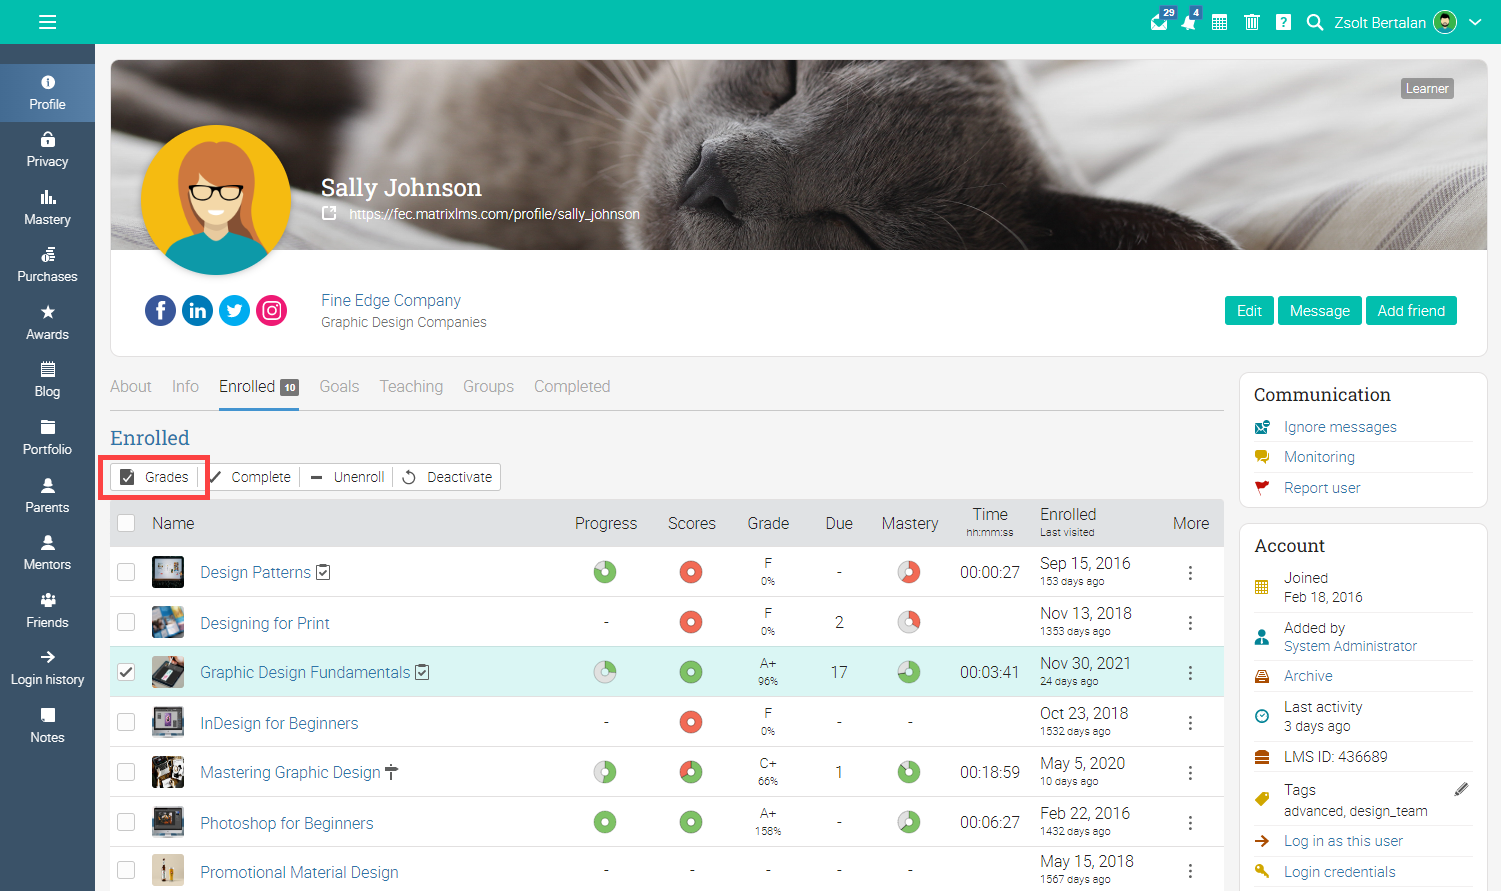
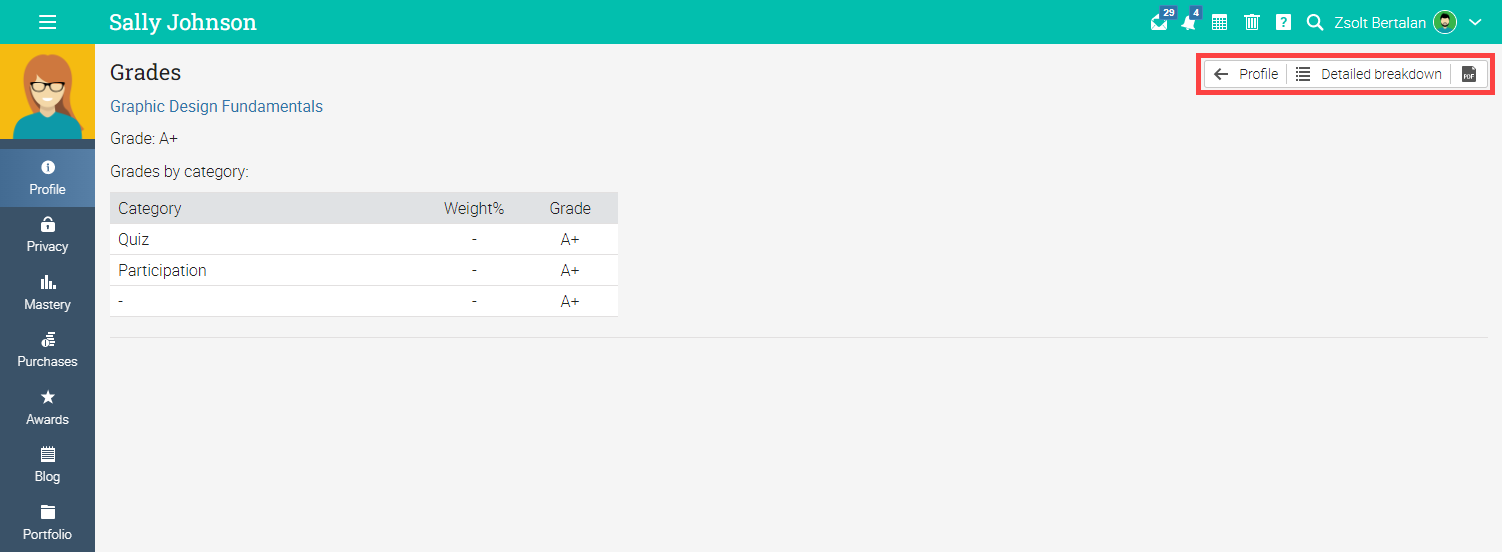
Learners' transcripts can be displayed directly on their profile page. Select the courses, then click on Grades.
Here you can view a detailed breakdown of the transcript, or you can save/print it.
On the learner's profile page, admins and instructors can see the number of days until the learner will be deactivated from a course. This information is available only for courses where you define the max number of days before the learner is deactivated. To set the max days before a learner is deactivated, go to the course and visit its Admin/Configure/Deactivation area.
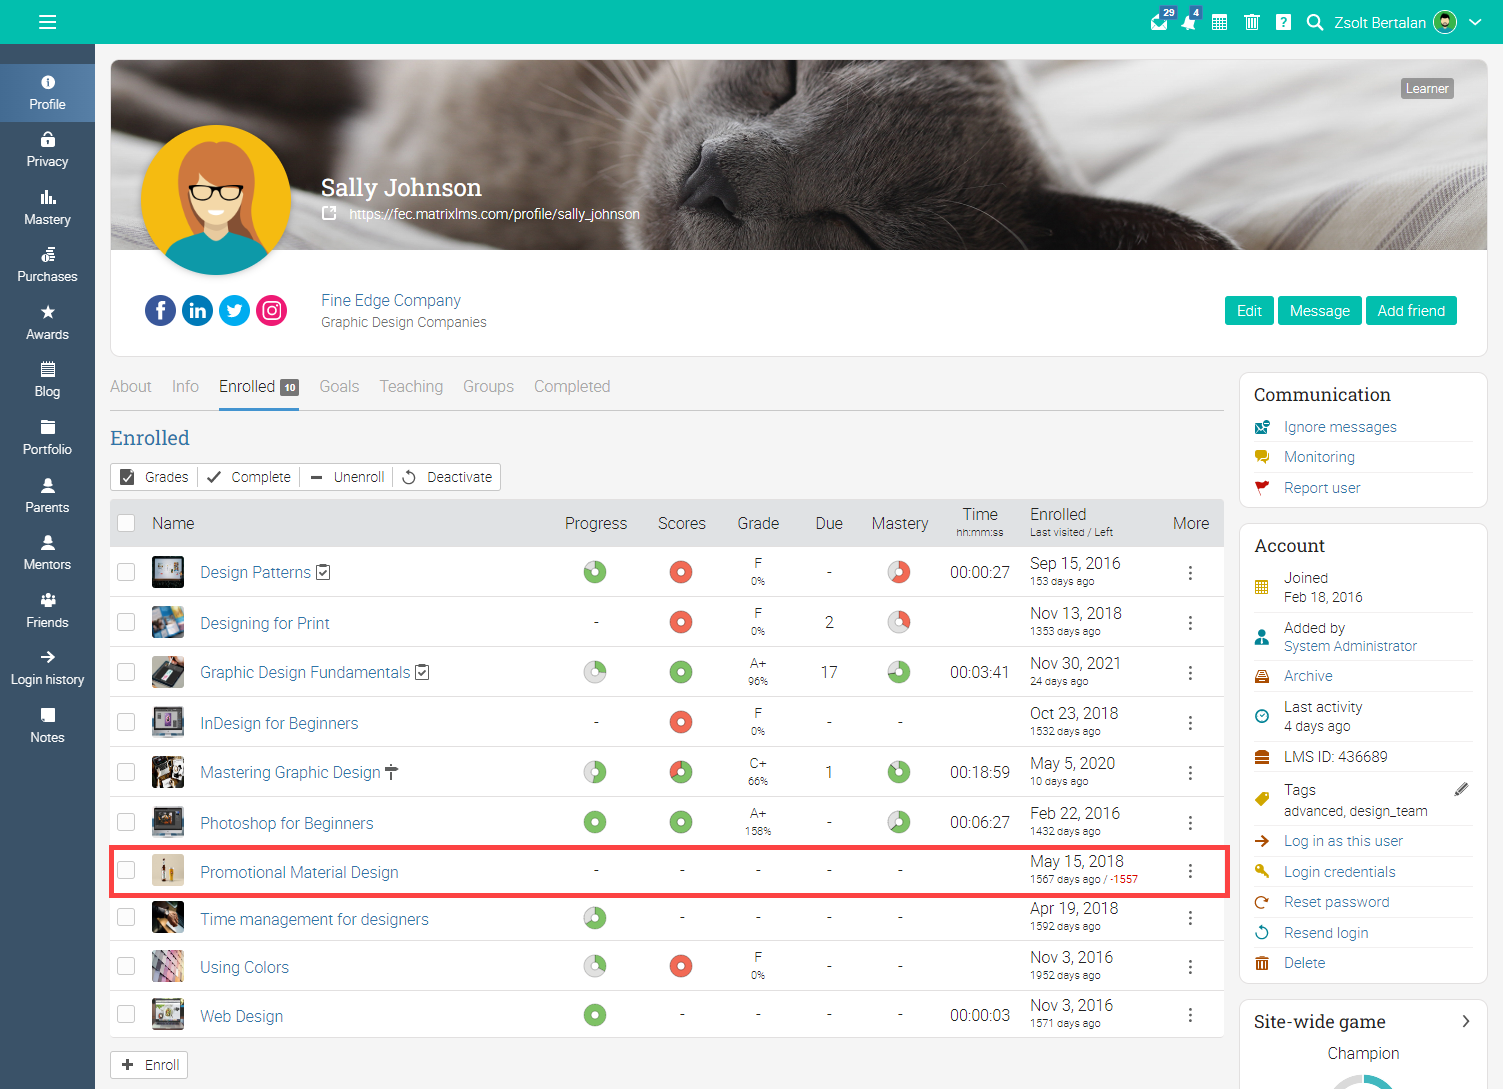
To extend the period until the learner is deactivated, click the ⋮ icon and select Extend.
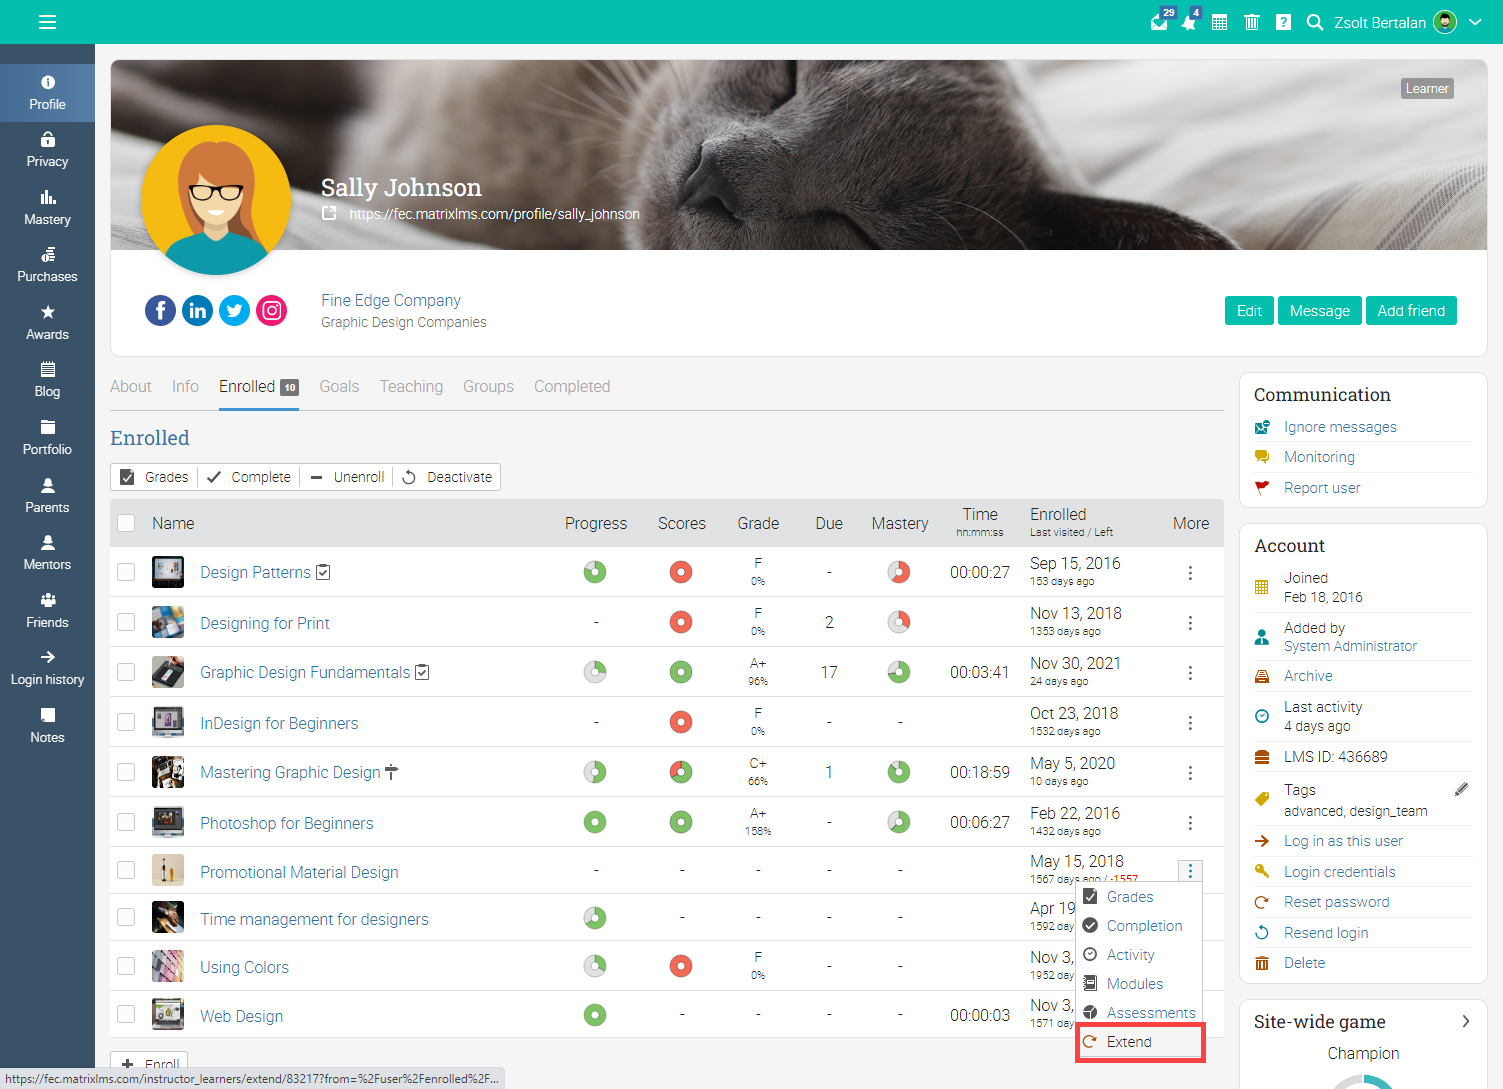
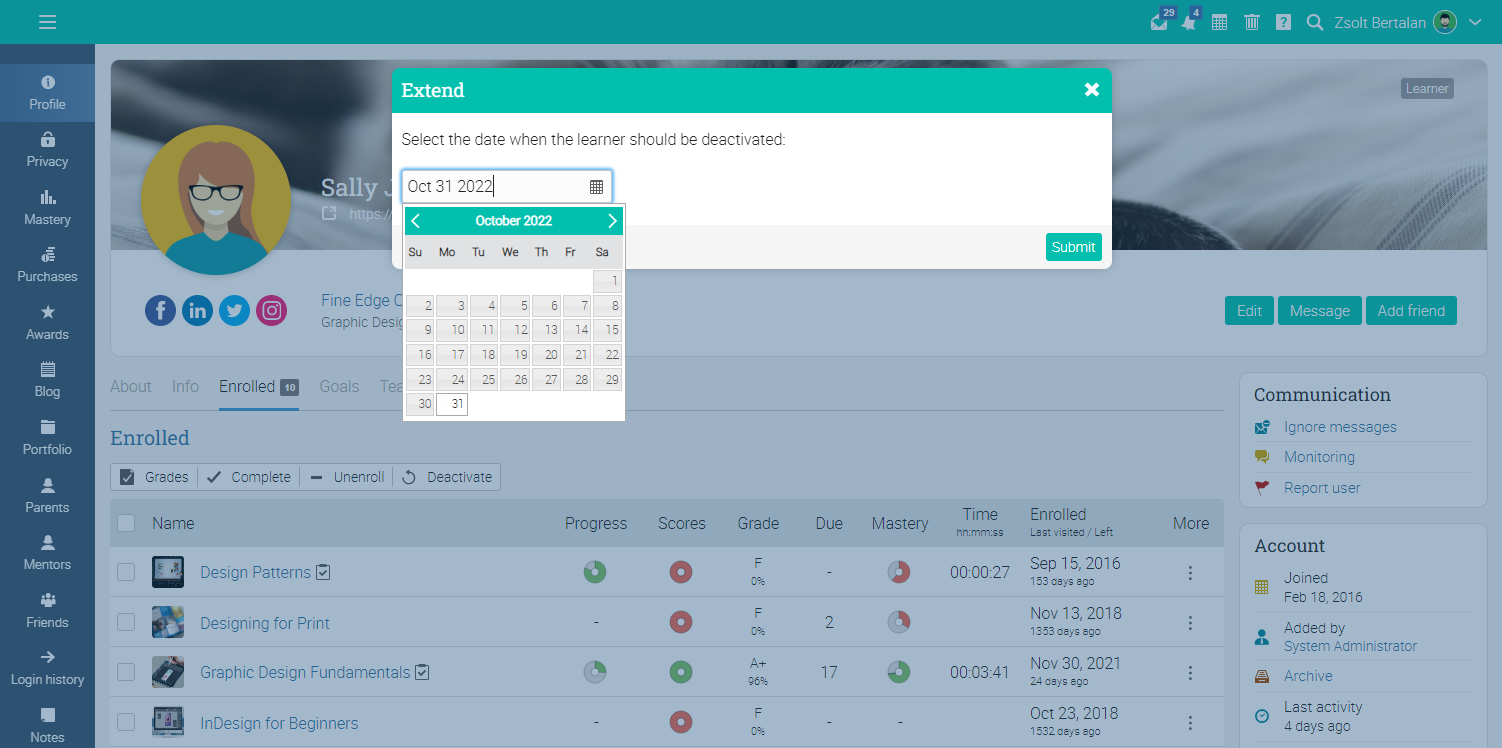
Select the date when the learner should be deactivated, then click Submit.
Instructor view
Instructors can see on learner profile pages information about the progress, grades, and mastery for the courses that learners are enrolled in and more. Instructors also have the right to view/print learners' transcripts. Instructors don't have editing and deleting permission, and they can't unenroll learners from courses from their profile pages.
Learner view
In the Enrolled tab of their profile page, learners can see their courses with information about their progress, scores, mastery, and more. Note that if a class is configured to not share mastery with the learners, they will not see the information related to mastery via their profile page.
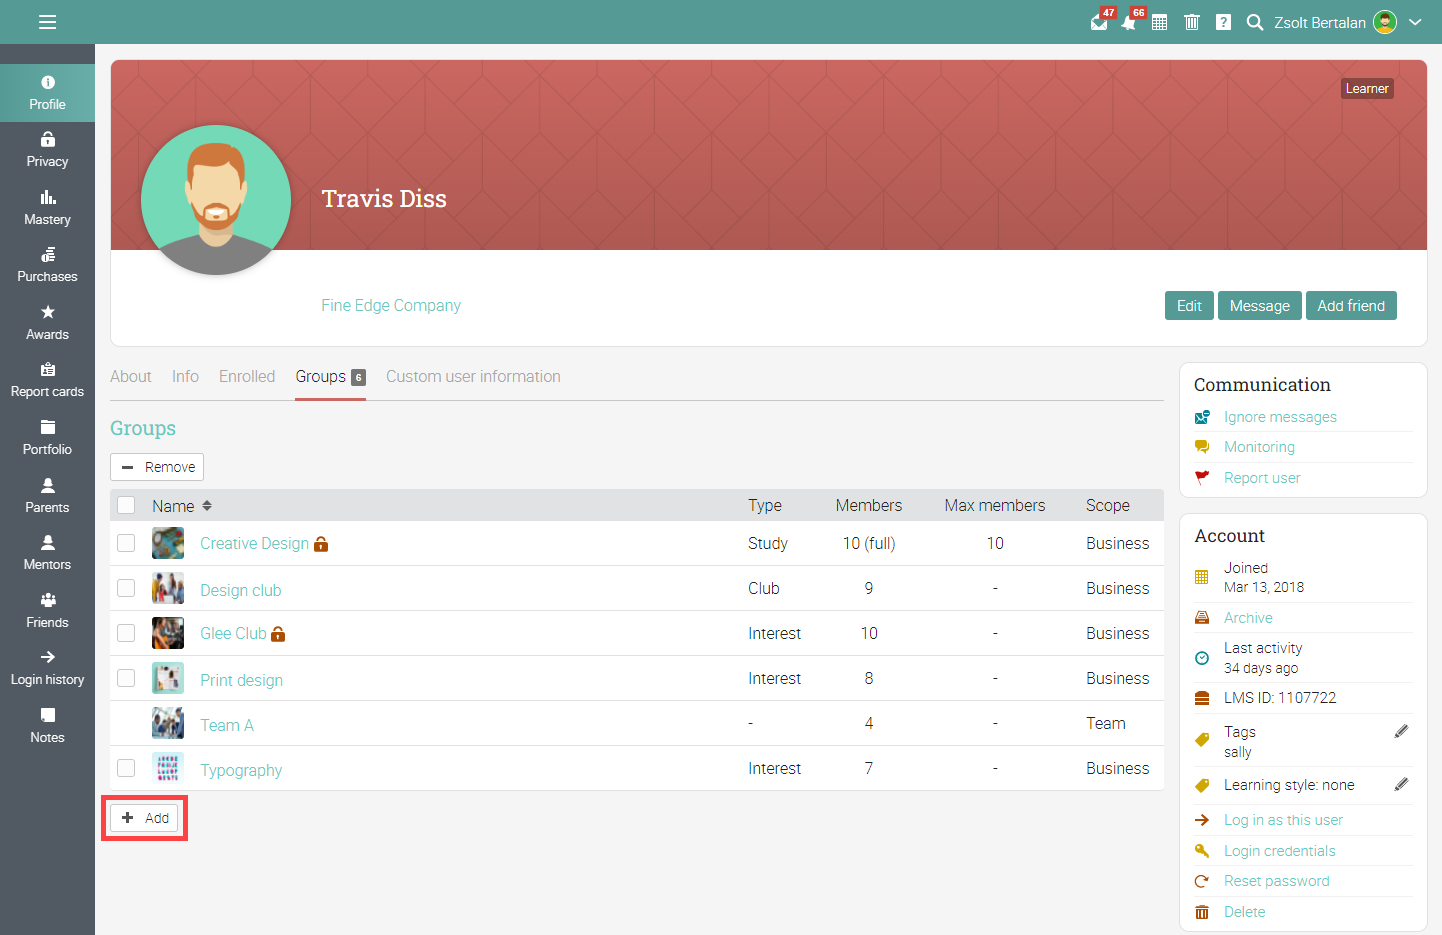
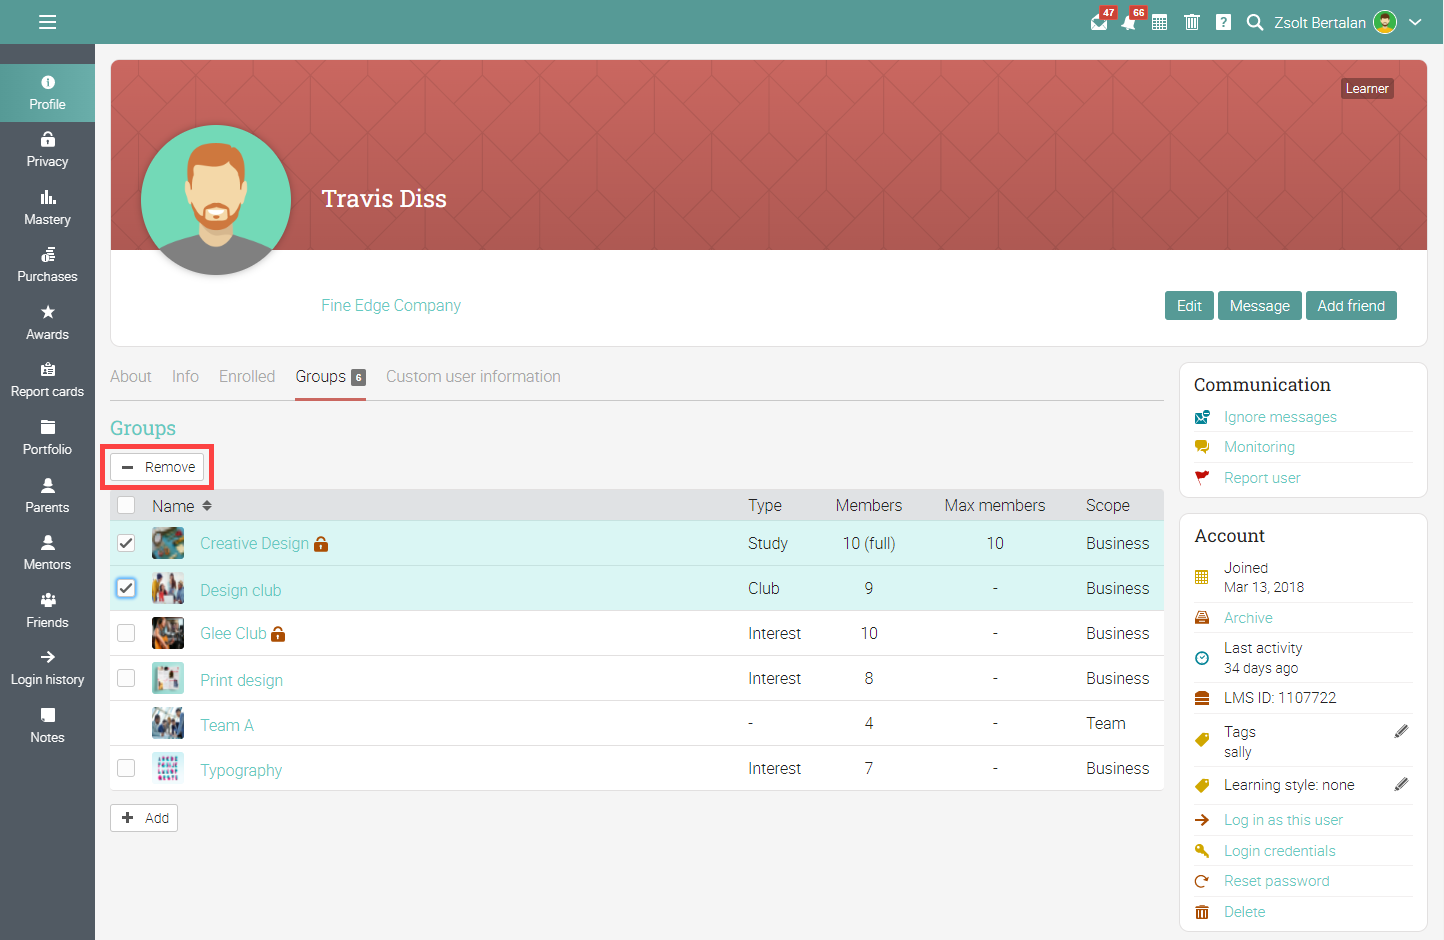
Groups tab
In the Groups tab, users can see the list of their groups, the type of groups, number of members, scope, and more.
.png?lmsauth=d9b2eaacdbf41e5b3f78d2901000c1886417e698)
If you are an administrator, you can add users to groups by clicking Add in the Groups tab of their profile page.
Select the Groups from the pop-up, then click Submit.
.png?lmsauth=fe39850179aeeee6137d43639c4c13e39af22480)
To remove the user from groups, select the groups, then click on Remove.
Teaching tab
In the Teaching tab of their profile page, instructors can see the courses and learning paths they are teaching.
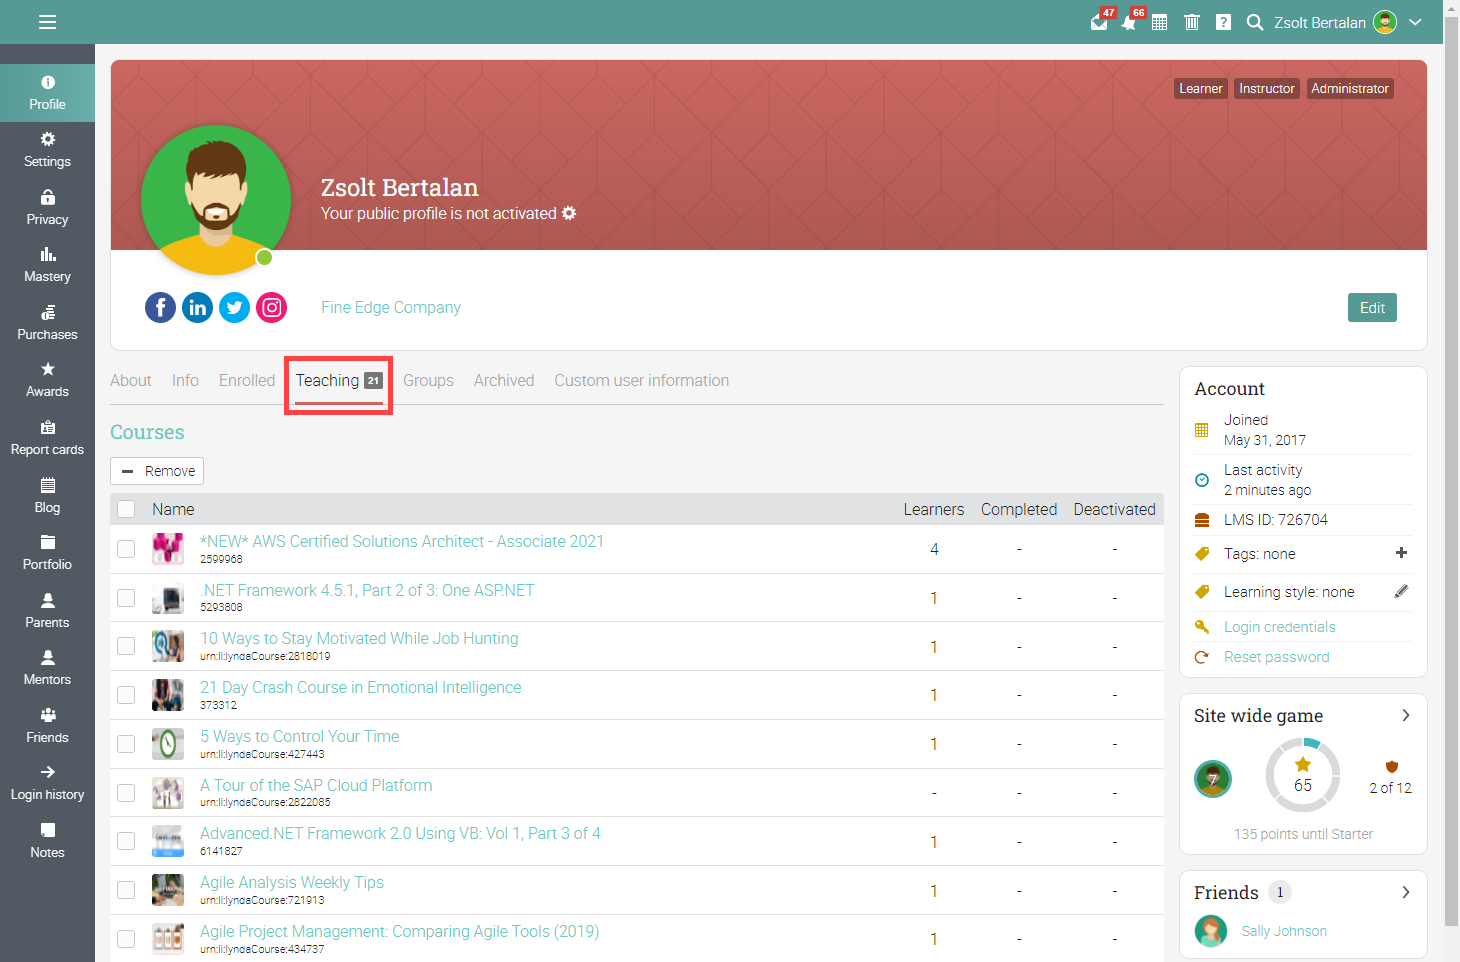
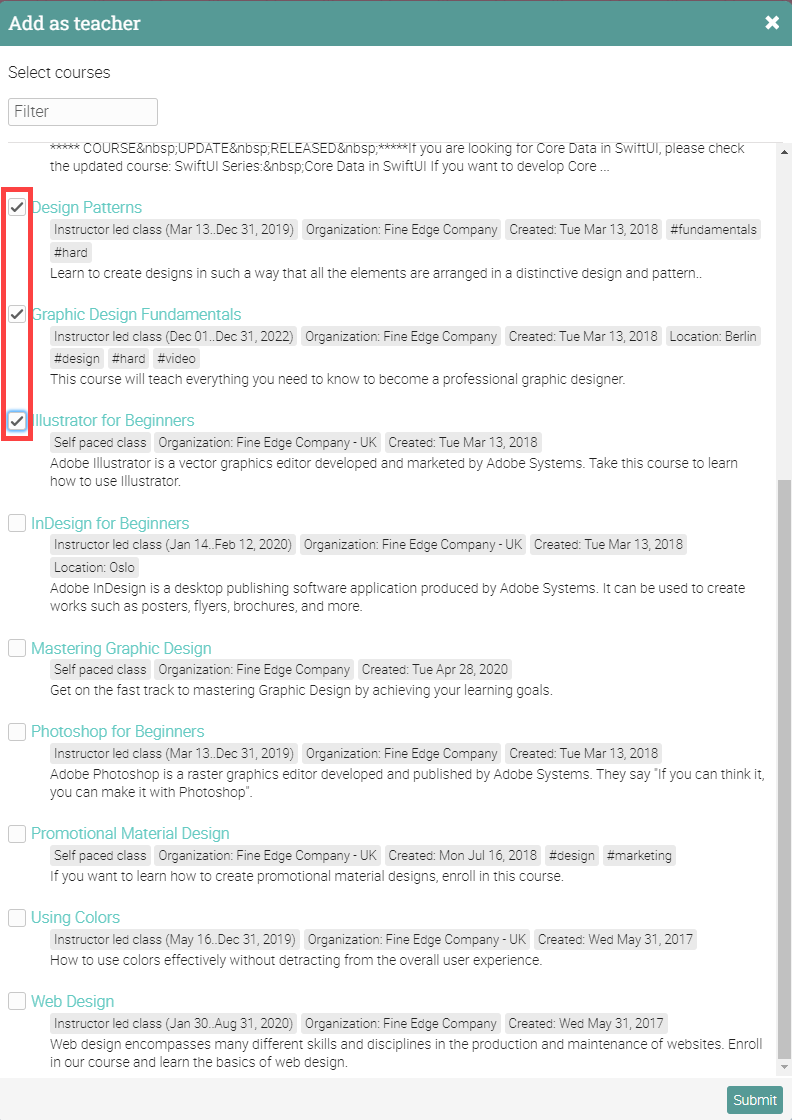
Administrators have access to the "Remove" and "Add" options so that they can add/remove instructors from courses directly from the Teaching tab of their profile page. To add the instructor to courses, click the Add button.
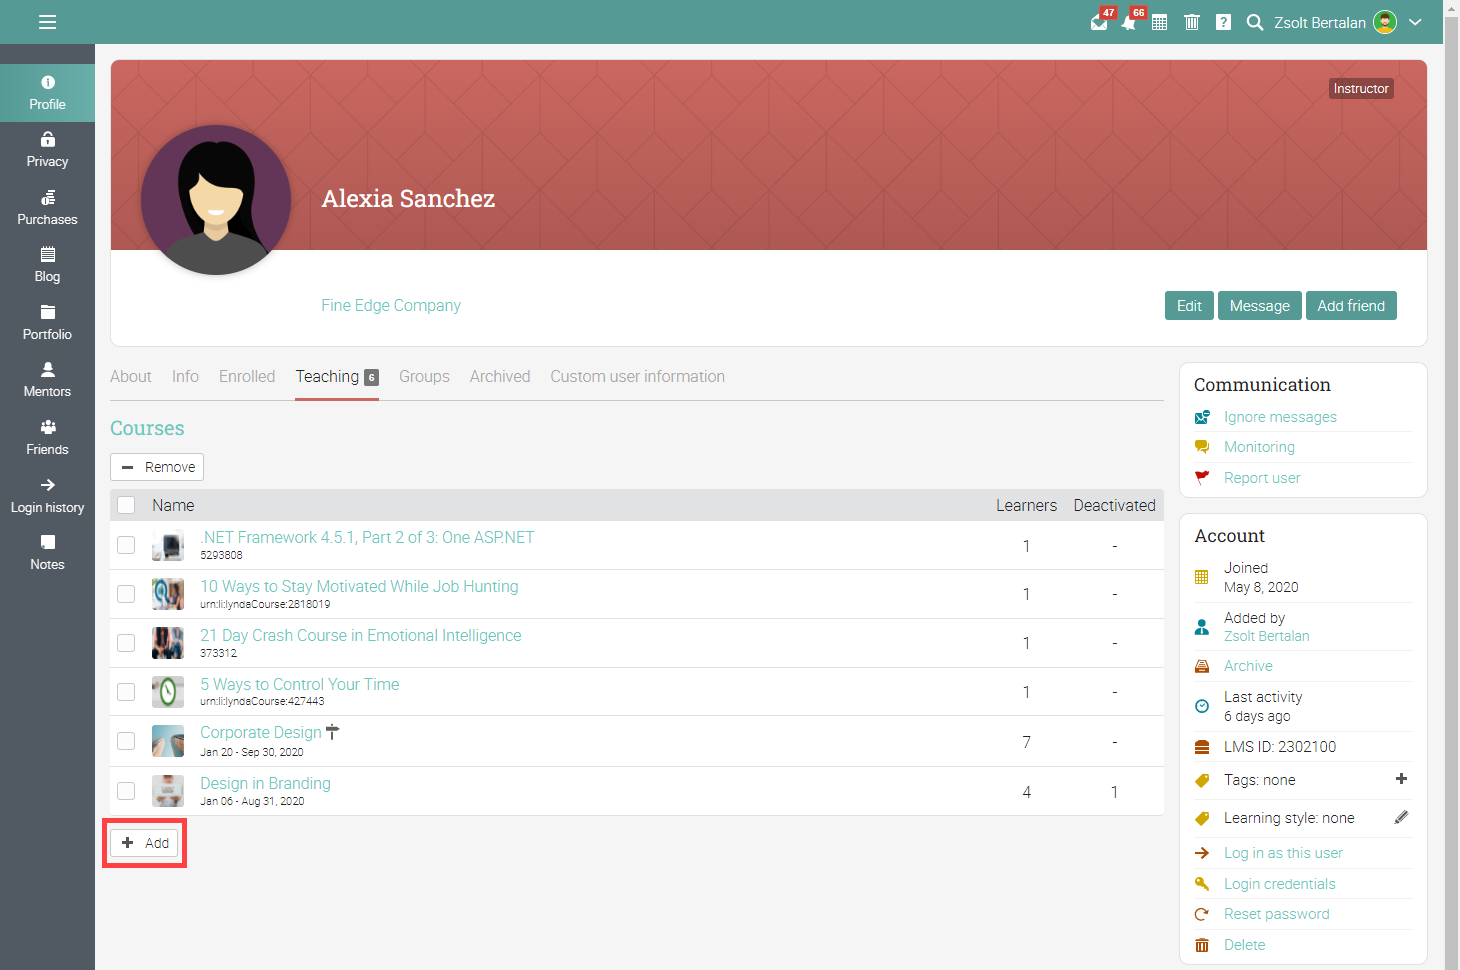
Select the courses from the pop-up, then click Submit.
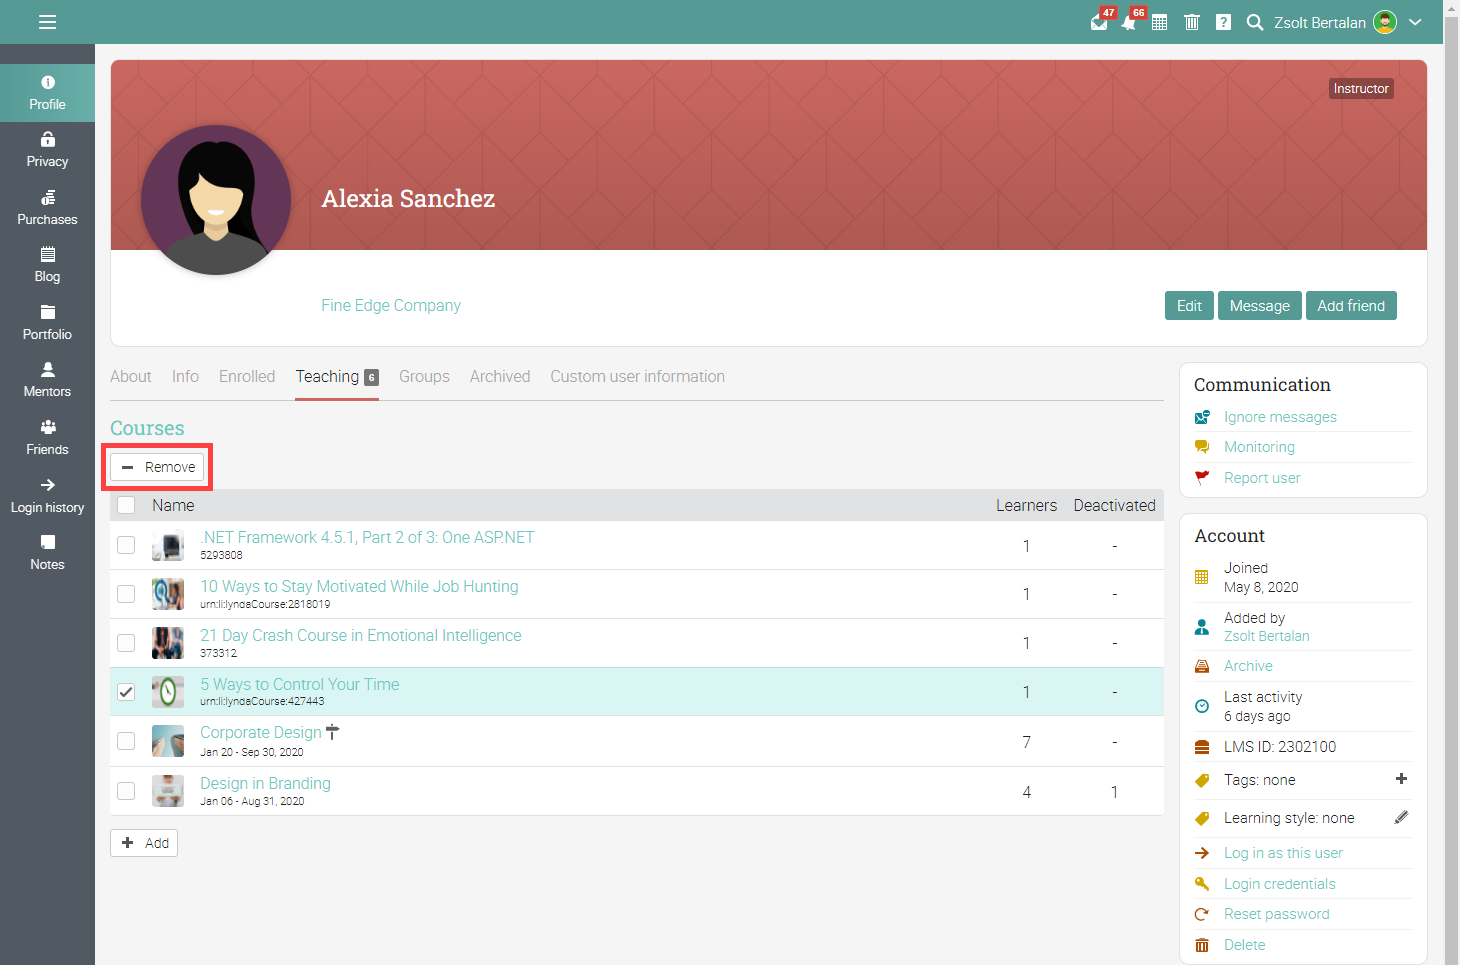
To remove the instructor from courses, select the courses, then click on Remove.
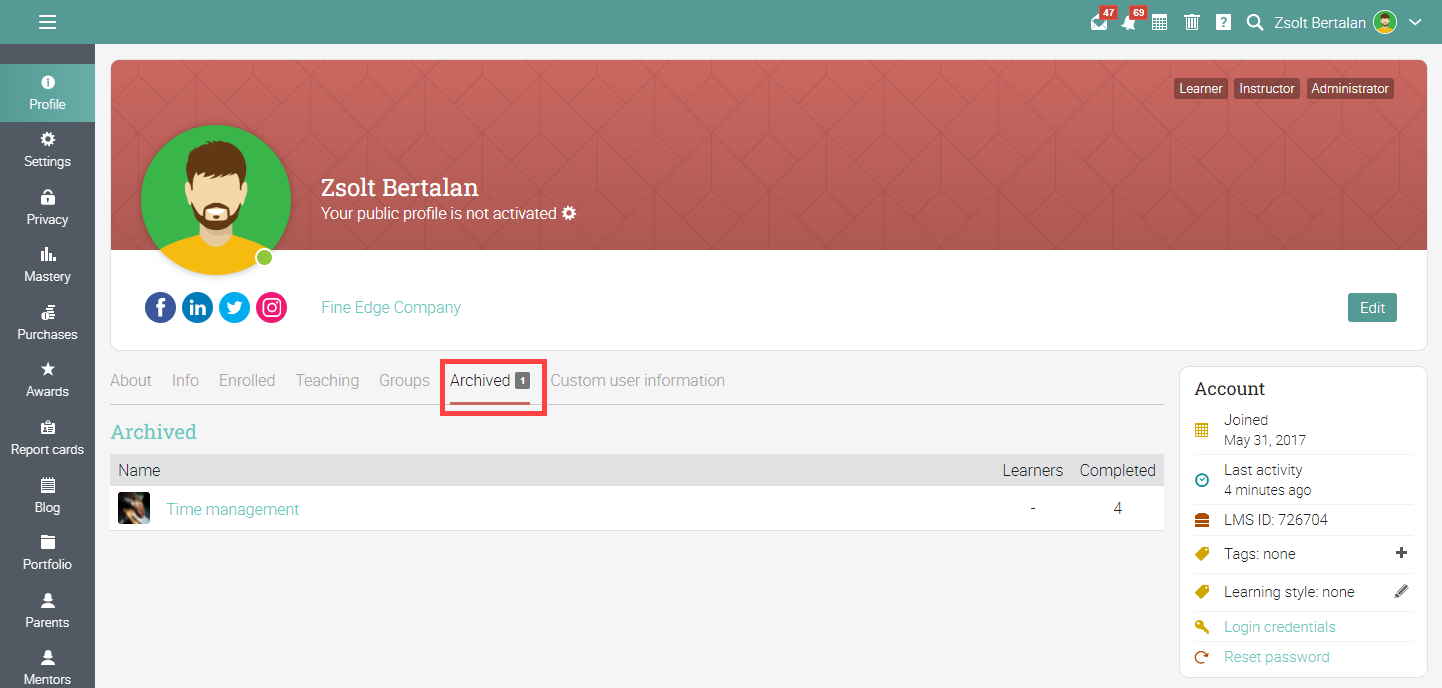
Archived tab
In the Archived tab, instructors can see the list of their courses that were archived.
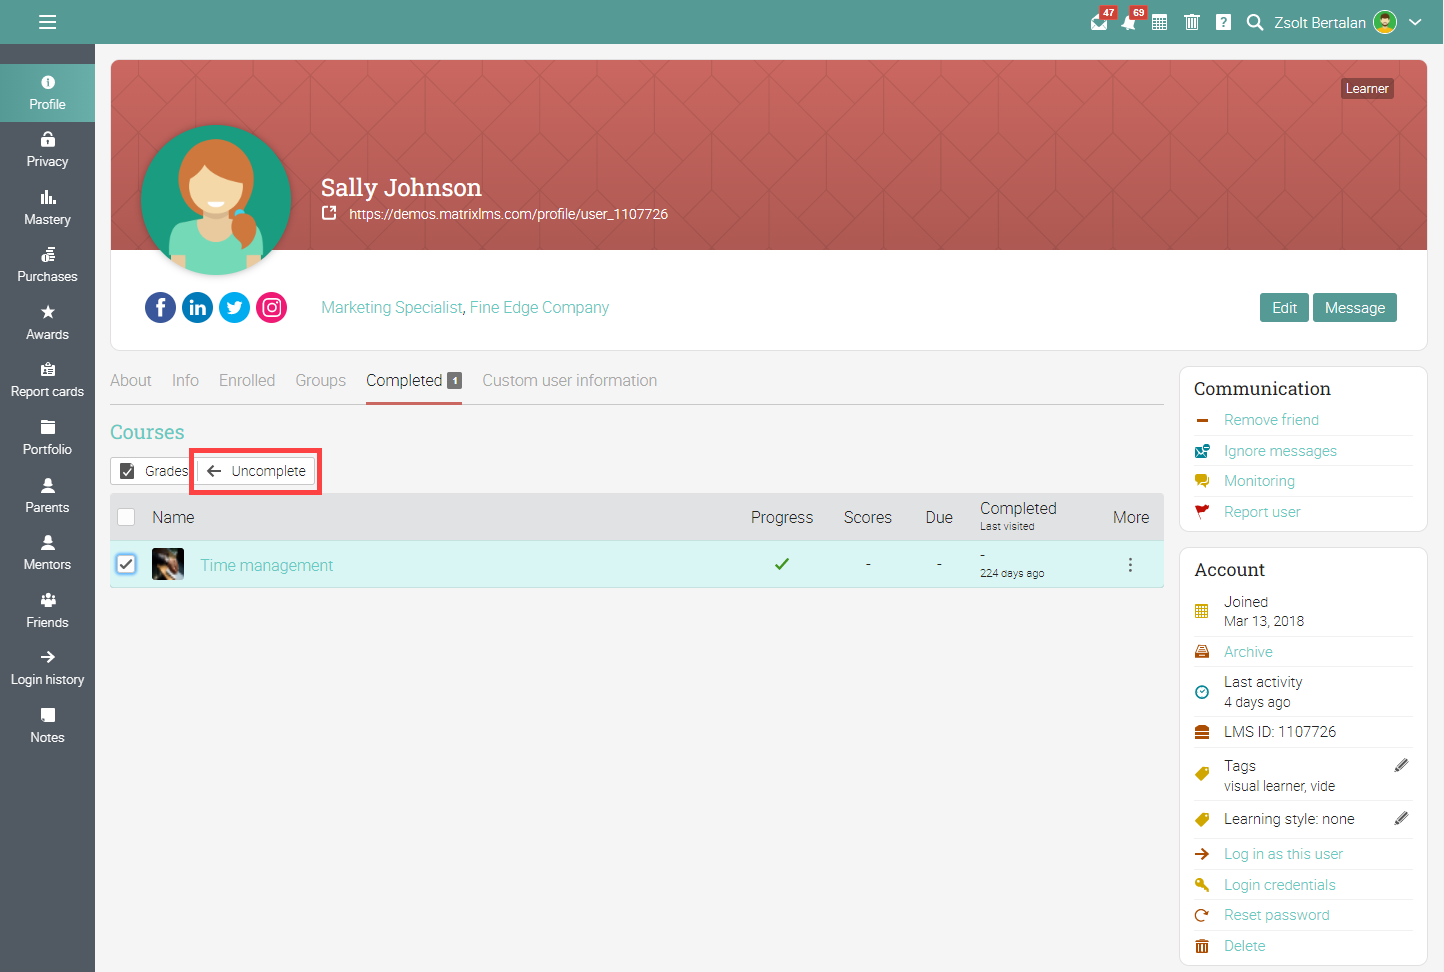
Completed tab
In the Completed tab are listed all the completed courses of the user.
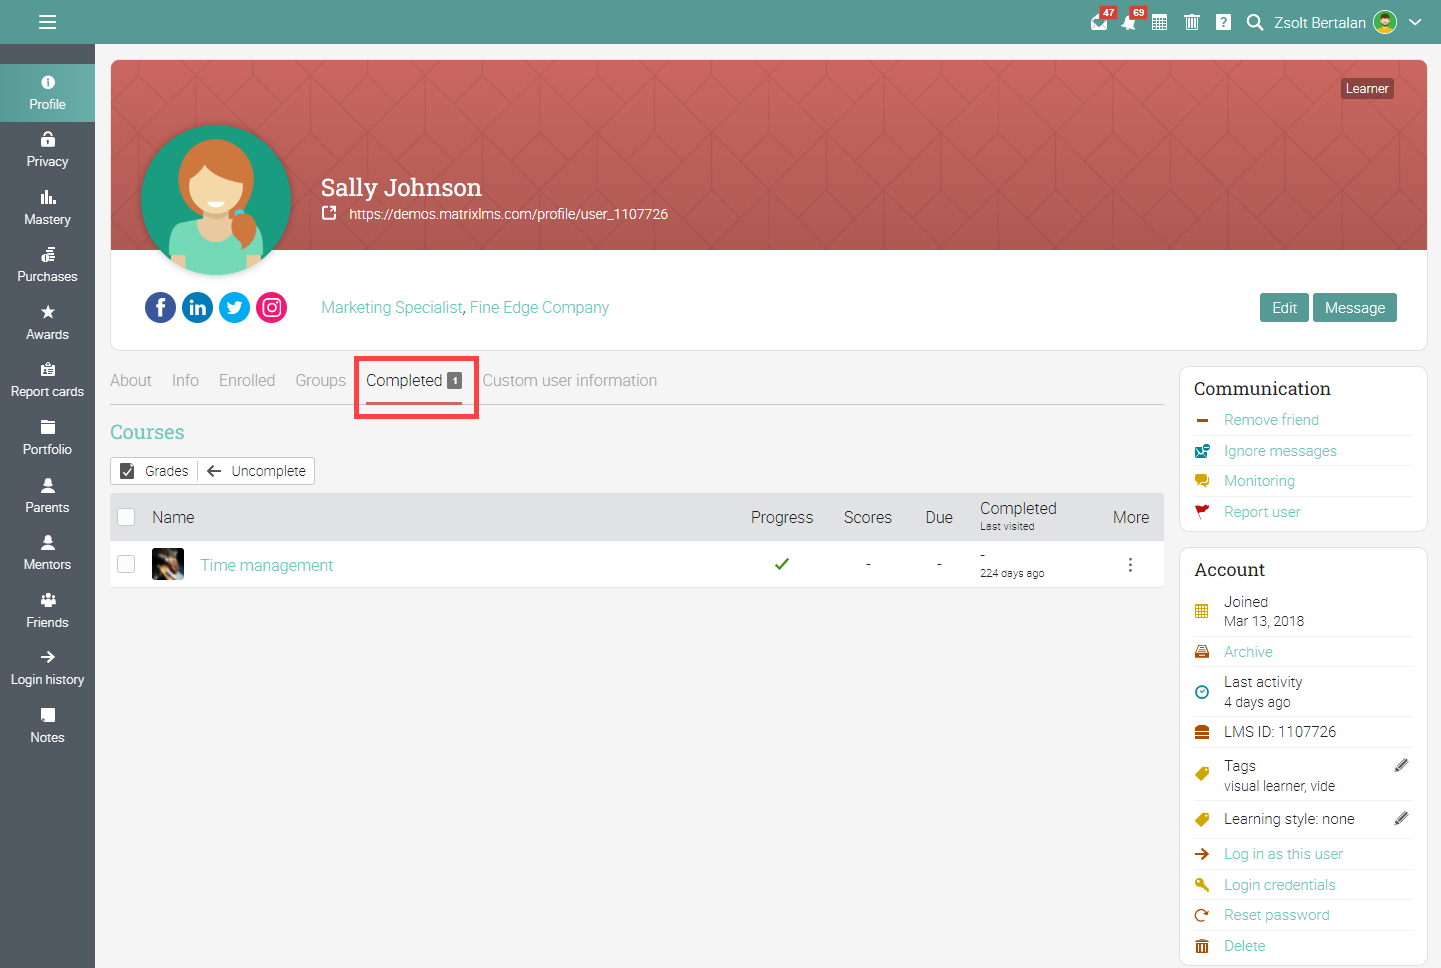
In the Completed tab of the learner's profile page, administrators can uncomplete courses and learning paths by selecting them and clicking Uncomplete.
Profile setting
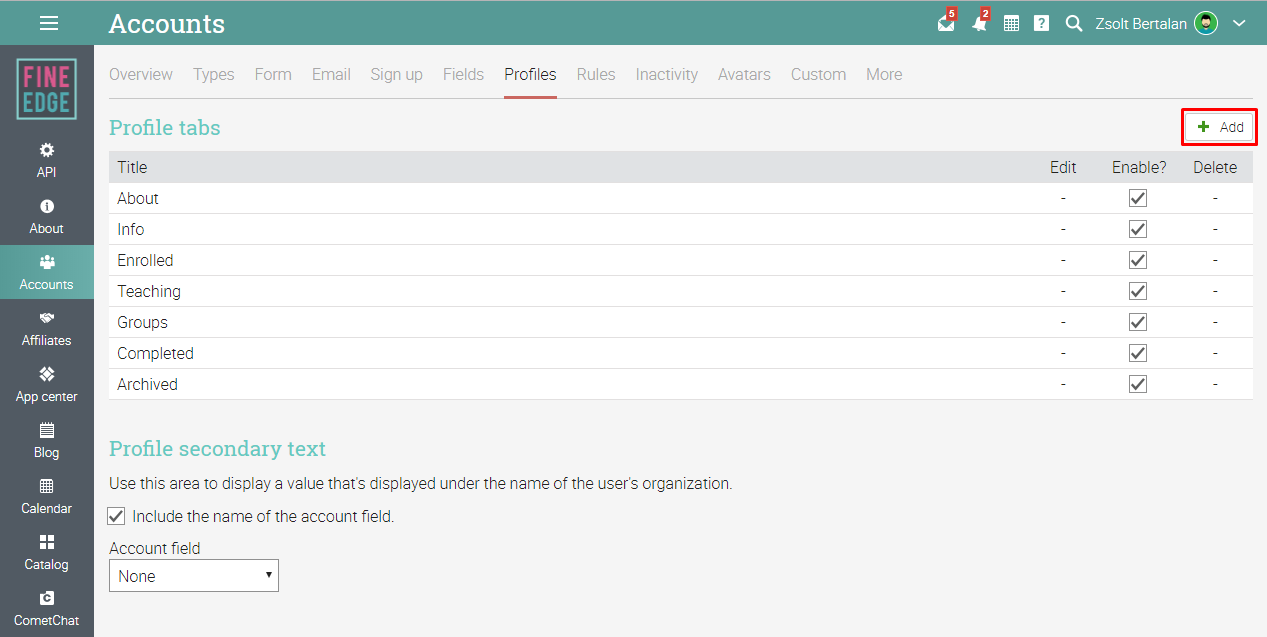
Custom tabs
The Admin/Accounts/Profiles area allows administrators to enable/disable/re-order existing profile tabs, and they can add custom tabs that will be available on the profile pages of users.
To add a custom profile tab, click on the "Add" button.
Give a name for the tab and enter the content using the built-in HTML editor. To make the tab personalized for each user, you can use a special syntax {{variable}}. The initial set of variables are similar to those in rule actions - user_first_name, user_last_name, user_full_name, user_full_name_with_link, user_email, and user_id.
.png?lmsauth=c1dce9f9d446224490e81a76605ca935422b8fe7)
After adding the custom tab, you can make changes to it by clicking on . You can disable/enable the tab, and you can delete it by clicking the icon.
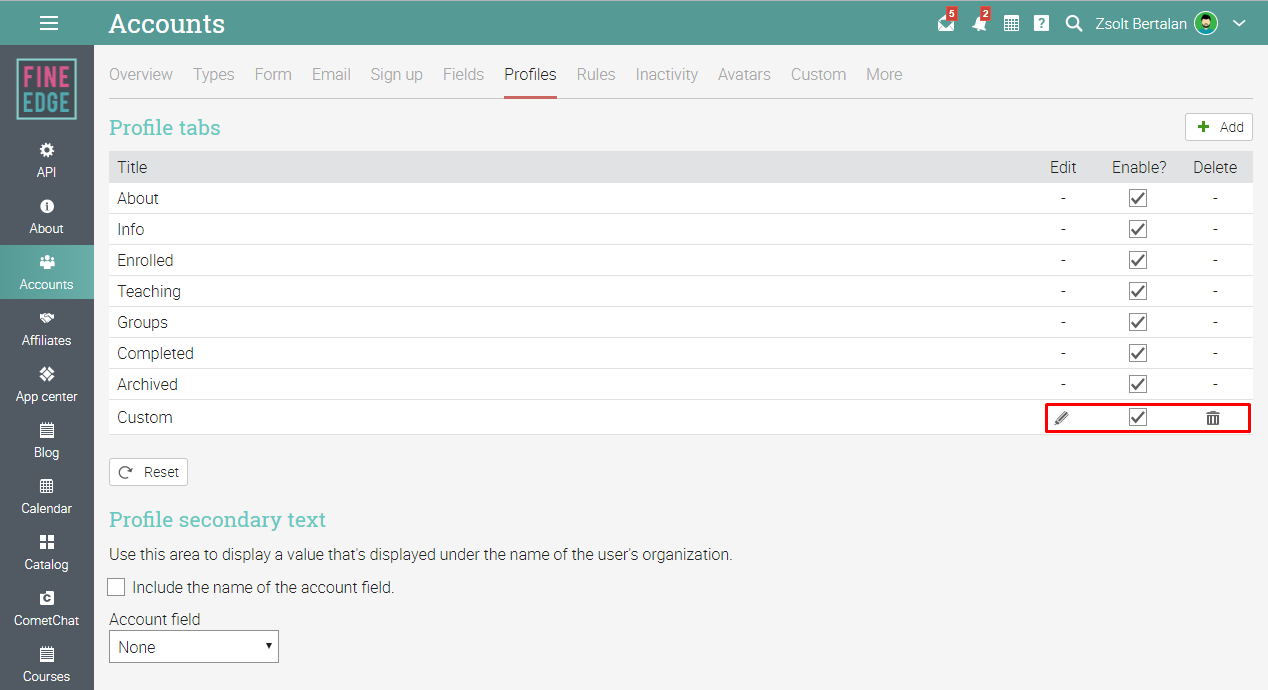
If the tab is enabled, it will be available on each user's profile page.
The most common use of custom tabs will be to use javascript to embed content from a third-party site/service related to the user. For example, if information about the user is located on a given system, it can be loaded based on the user's email address, then you can create a custom tab whose HTML uses javascript combined with {{user_email}} to load and display that user's data from that system.
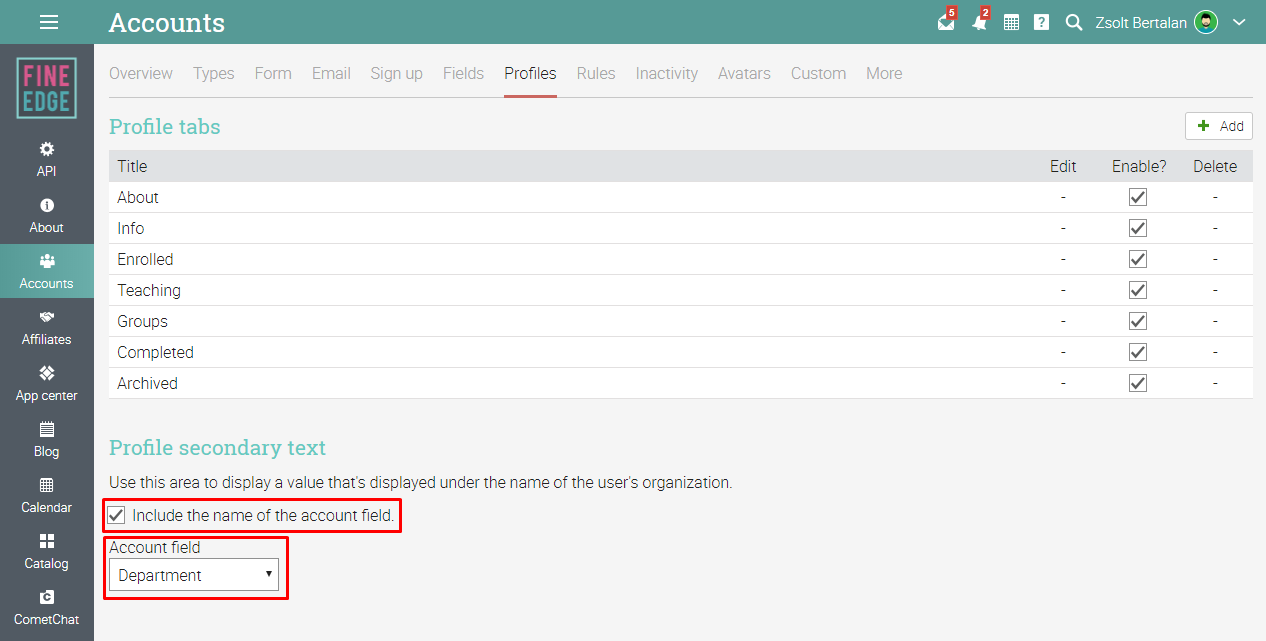
Profile secondary text
You have the option to get a secondary text from an account field via the Admin/Accounts/Profile area by selecting it from the dropdown.
.png?lmsauth=eb71e06dd4de6383507af5a84c018c9c6f47e8c1)
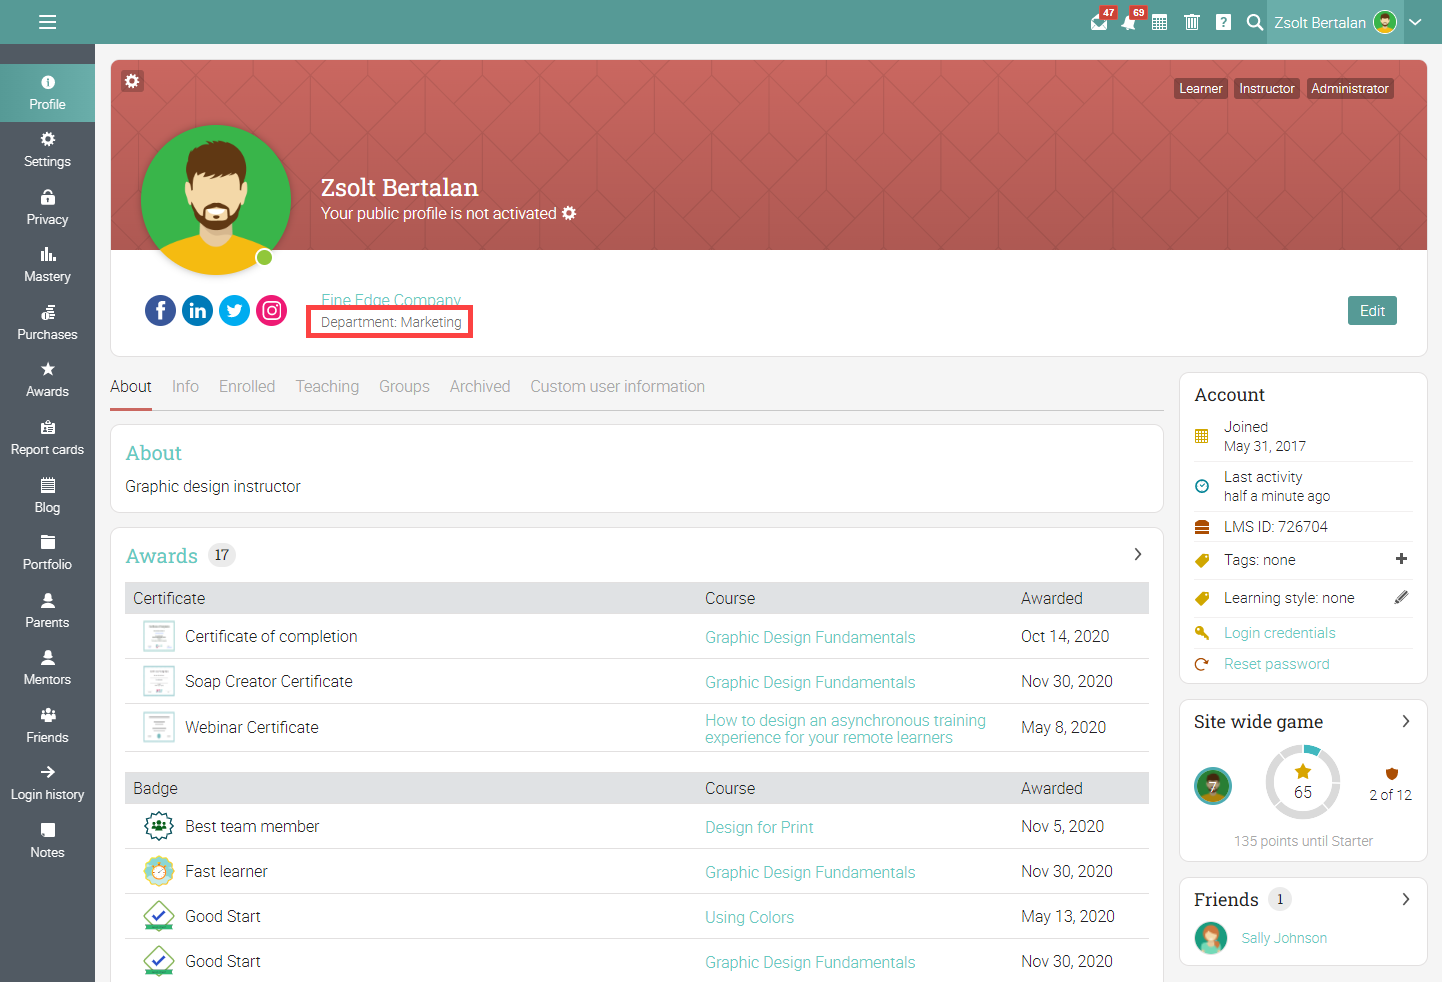
For example, if you have a "Department" account field, you could display the value of this field as the secondary text, including optionally the name of the field itself.
The information will be displayed under the primary text on your profile page.
The secondary text in the profile is calculated as follows:
- If you have set up an account field to get the secondary text and value of that field is present for the user, display that account field, otherwise
- If you are using organizations and the user is not in the default or "none" organizations, we display the name of the site as the profile secondary text, otherwise
- If you are using the network feature, then we display the name of the network as the secondary text, otherwise
- Don't display anything.
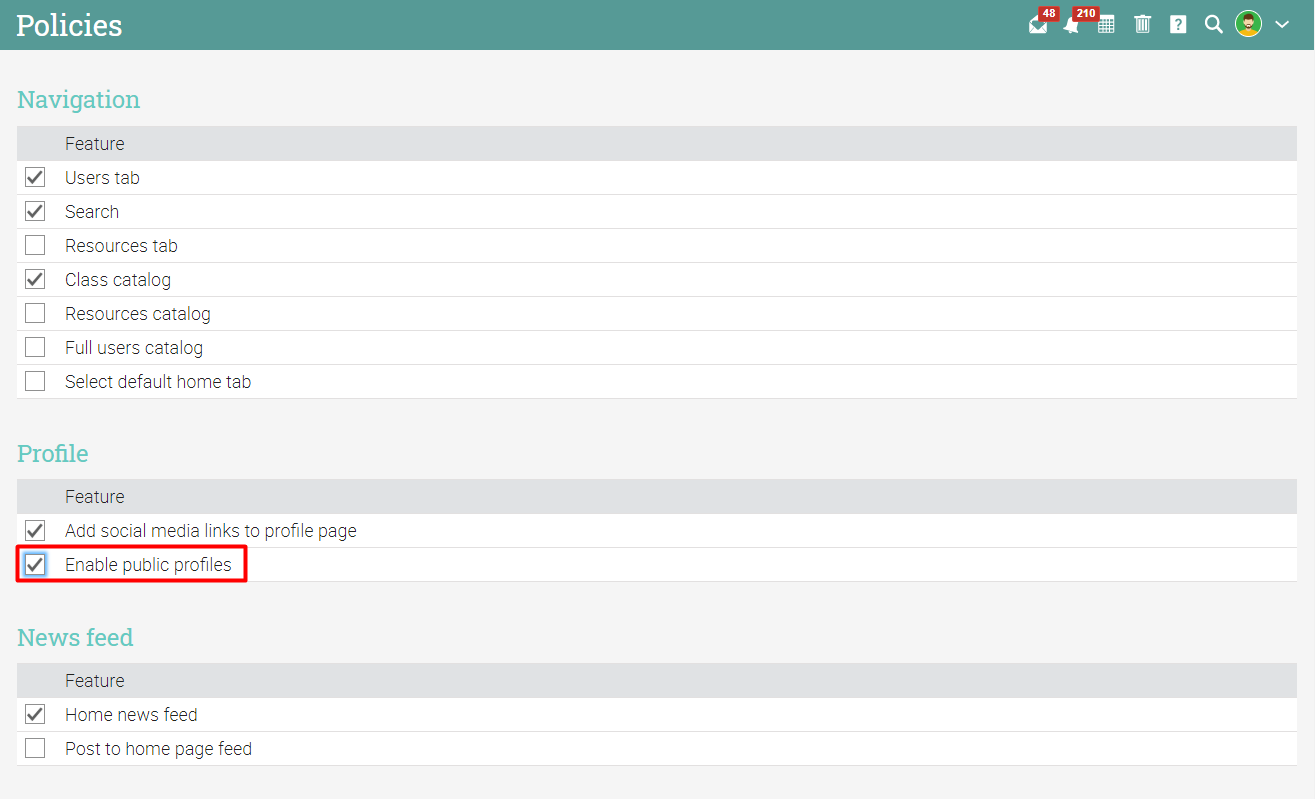
Public profile
Administrators can enable public profiles by installing the app from the App Center. Please note that public profile pages are not available for archived users.
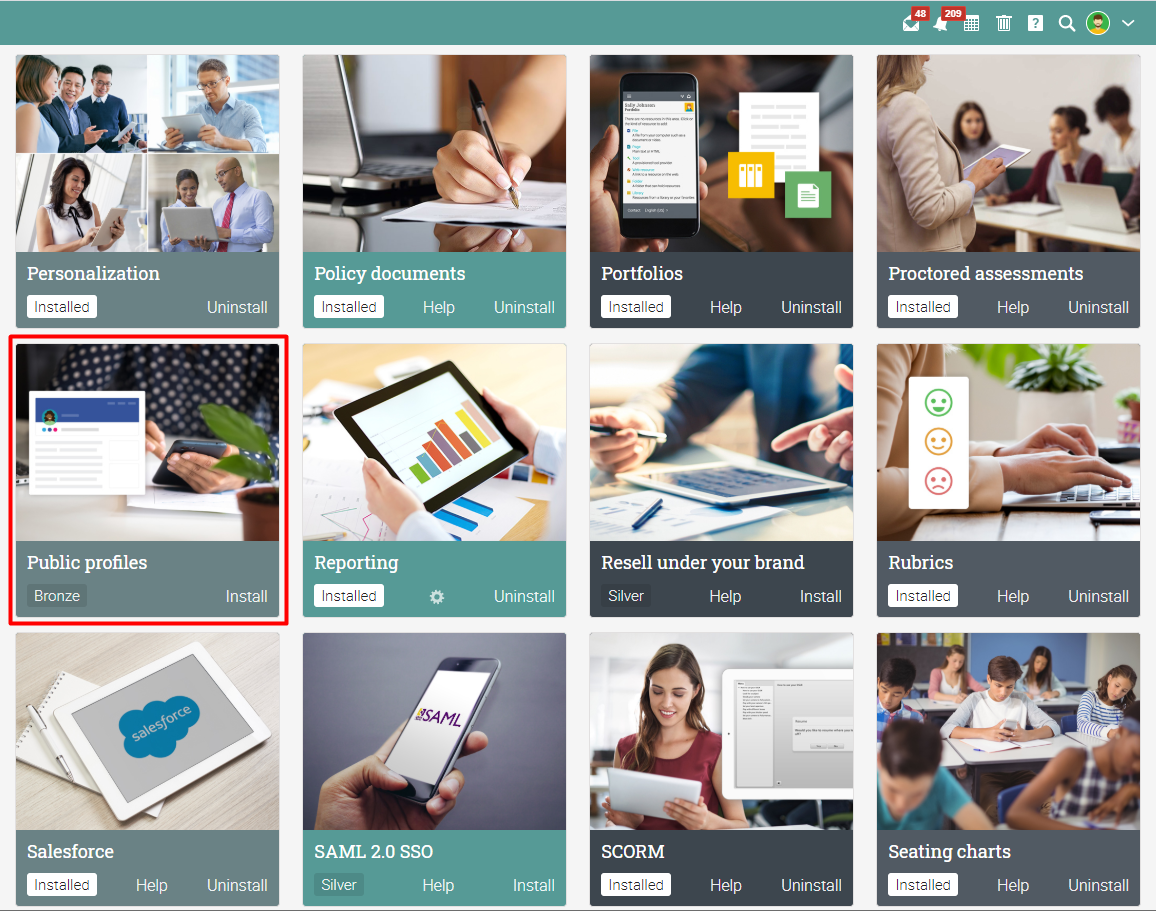
After installing the app, public profiles are enabled for most account types except for learners. To enable public profiles for learners, go to the Admin/Policies/Learners area and click "Enable public profiles" in the Profile section.
When public profiles are enabled, they are not activated by default. This is indicated on the user's profile, under their name.
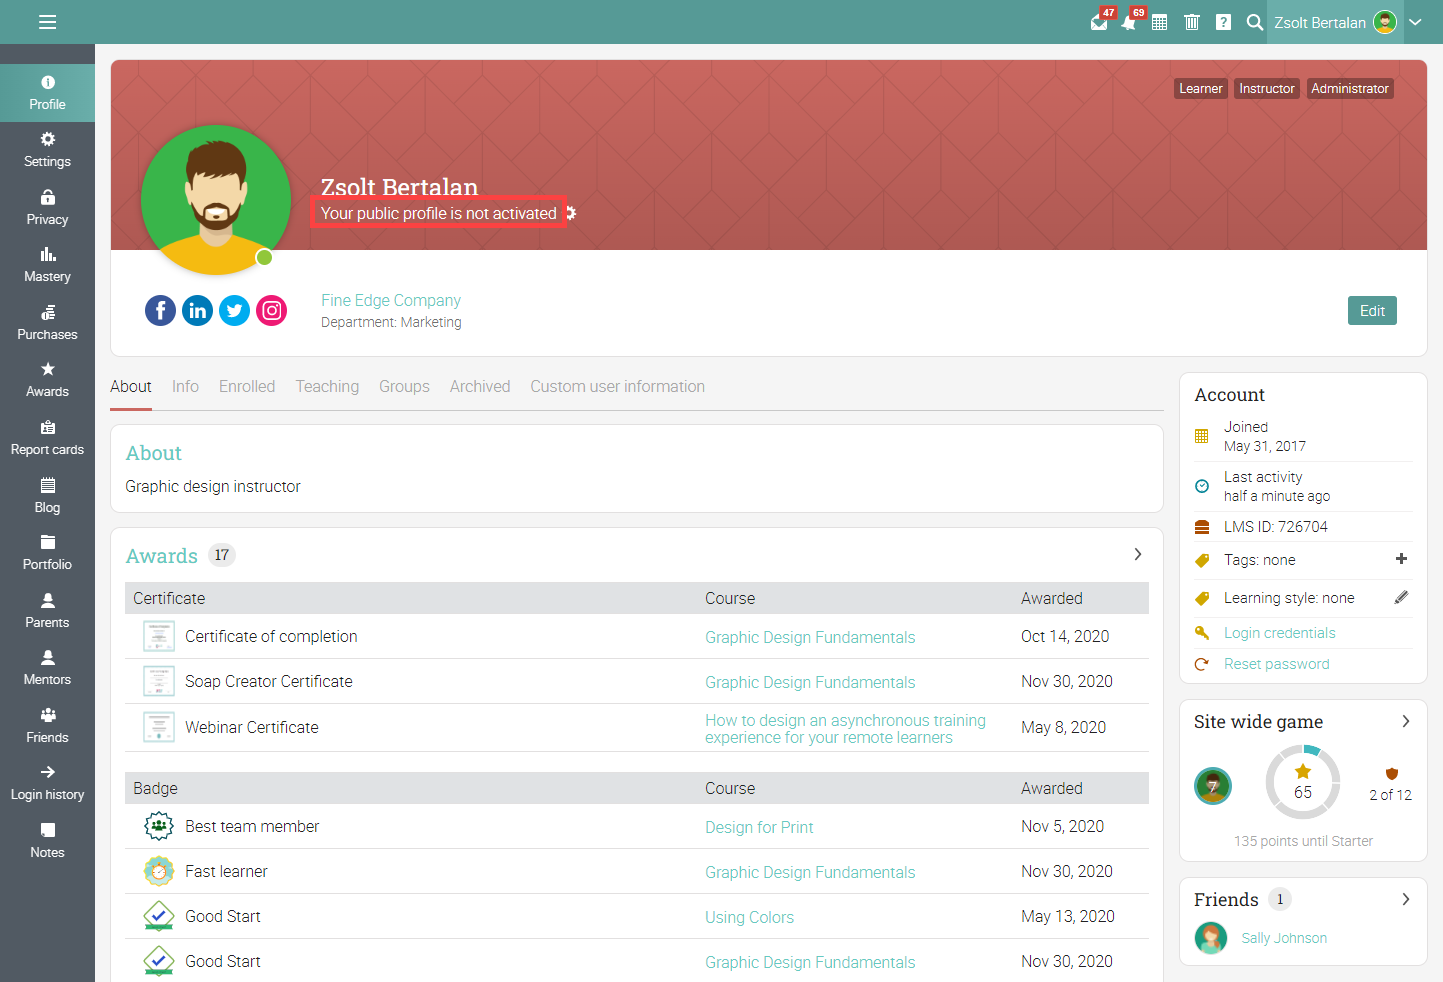
To active the public profile, click on the cog.
.png?lmsauth=4e23ada564d27512b1a7744ac012dbc431cb84dd)
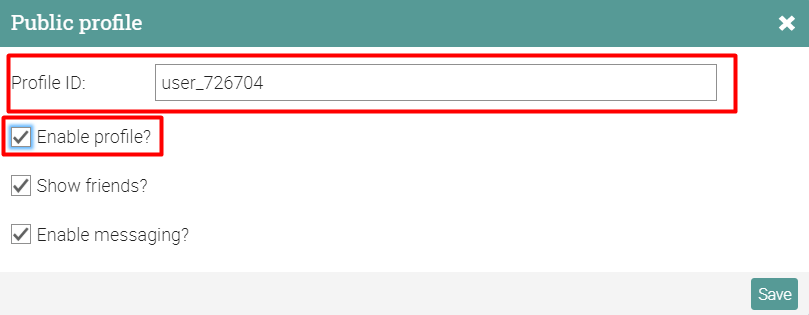
Then select a unique URL for the profile and check the "Enable profile" option. Here you can also select if you want to show friends and/or allow visitors to send a message.
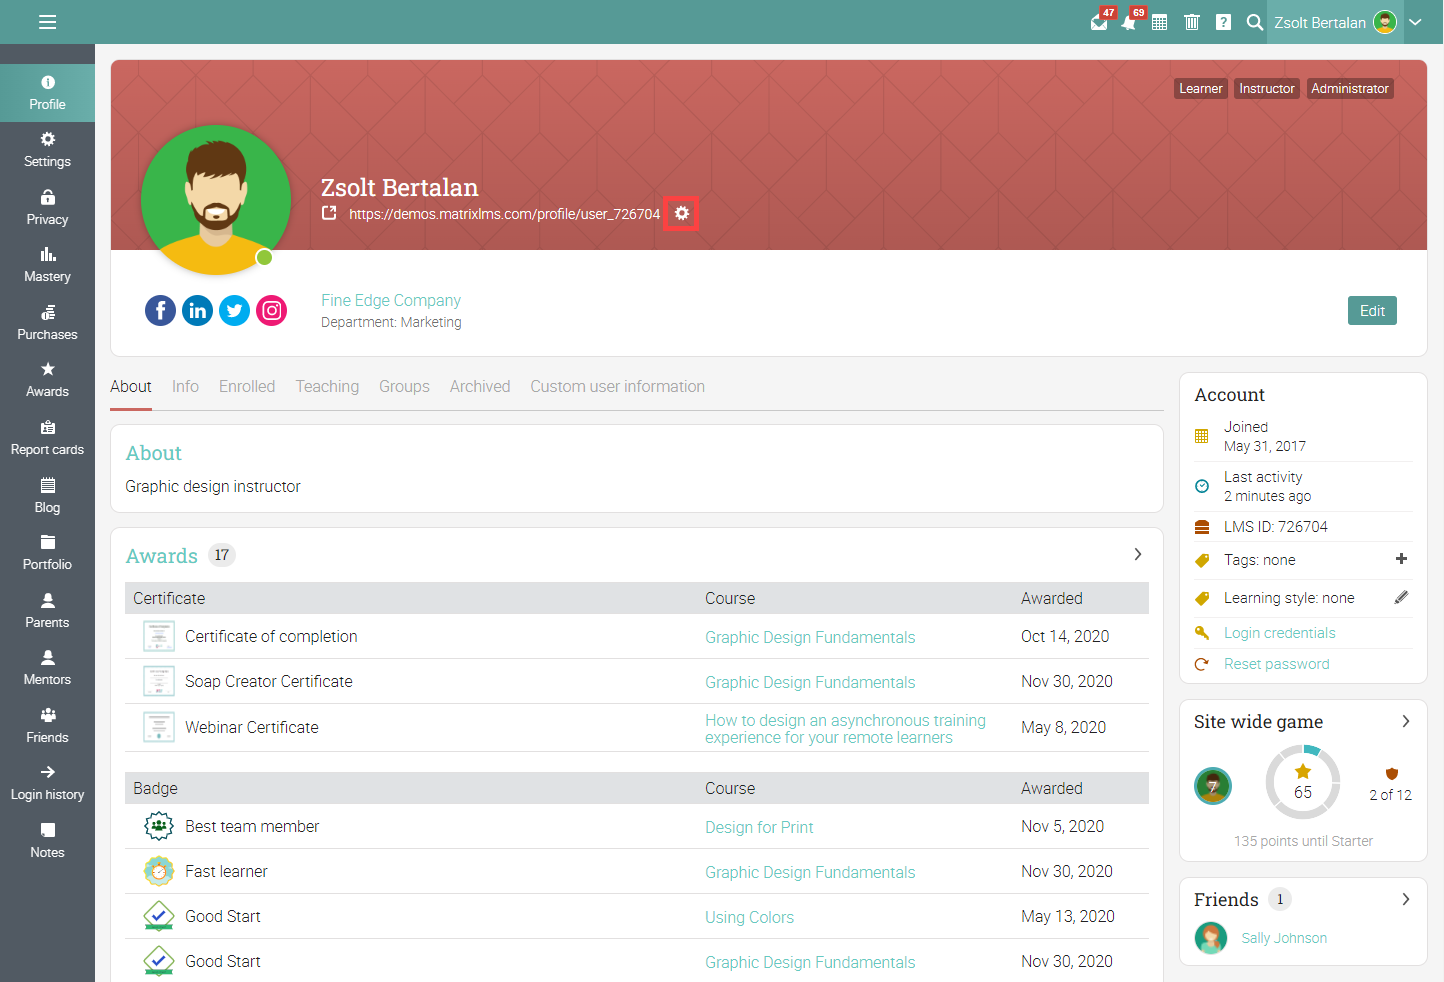
Users can click on the cog at any time to change the public profile settings.
You can also change the background picture of your profile page by clicking on the cog in the upper-left corner of the image. Please note that first, you need to enable the "Allow admins and instructors to upload their own profile background" and "Allow learners to upload their own profile background" options via Admin/Policies/General/Profiles.

When a public profile is enabled, its URL is displayed on the user's profile page and can be seen by everyone.
.png?lmsauth=e91ec751b62d78e1d9ff8e79eb114adf7489b4e2)
If you visit the URL, you will see the public version of the profile page.
Here you will see the awards received by the user. You can click "See all" to see a larger tiled view of the awards.
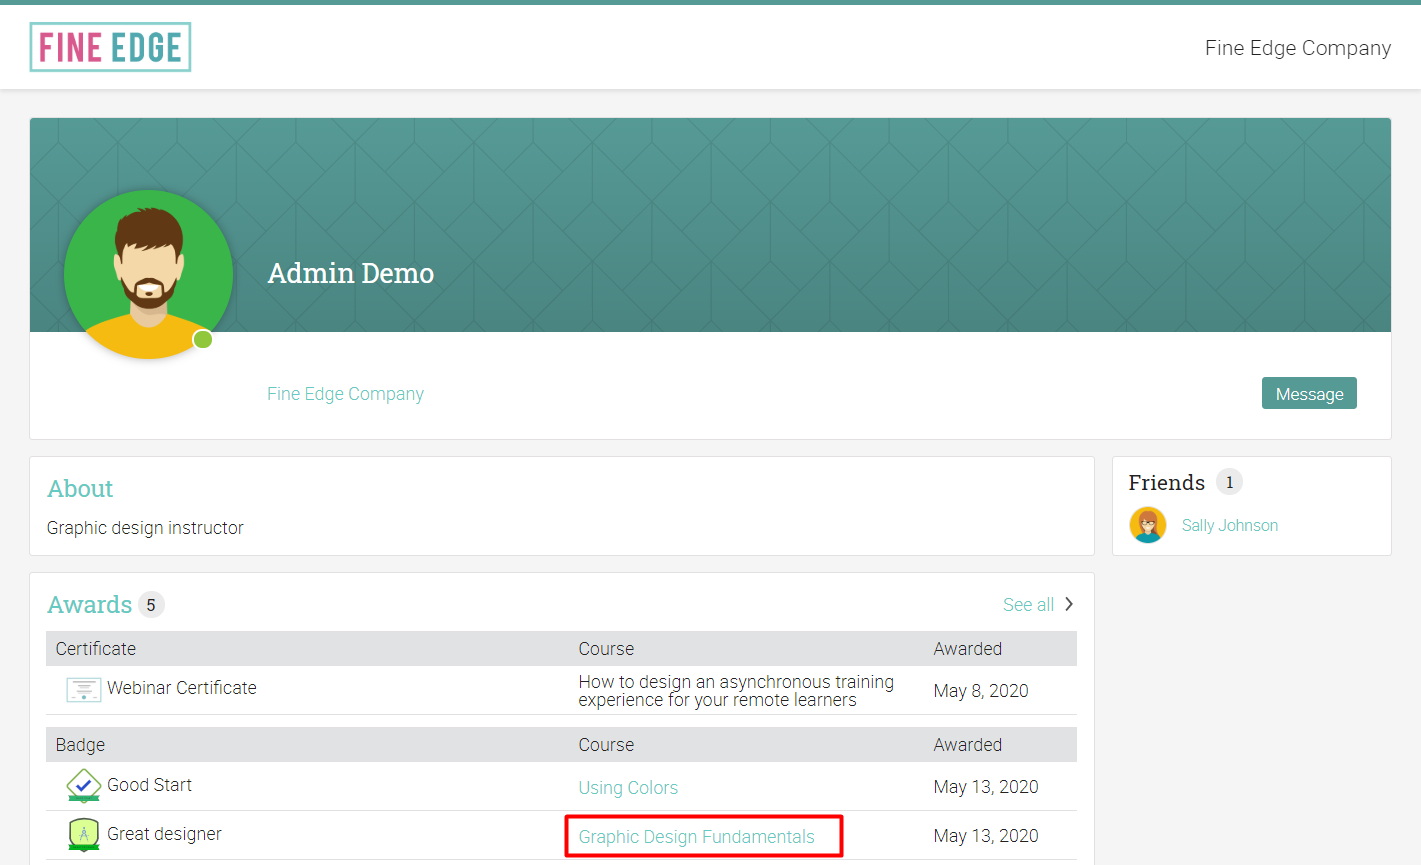
If the class or learning path associated with an award has a public catalog page, it will be linked to that page.
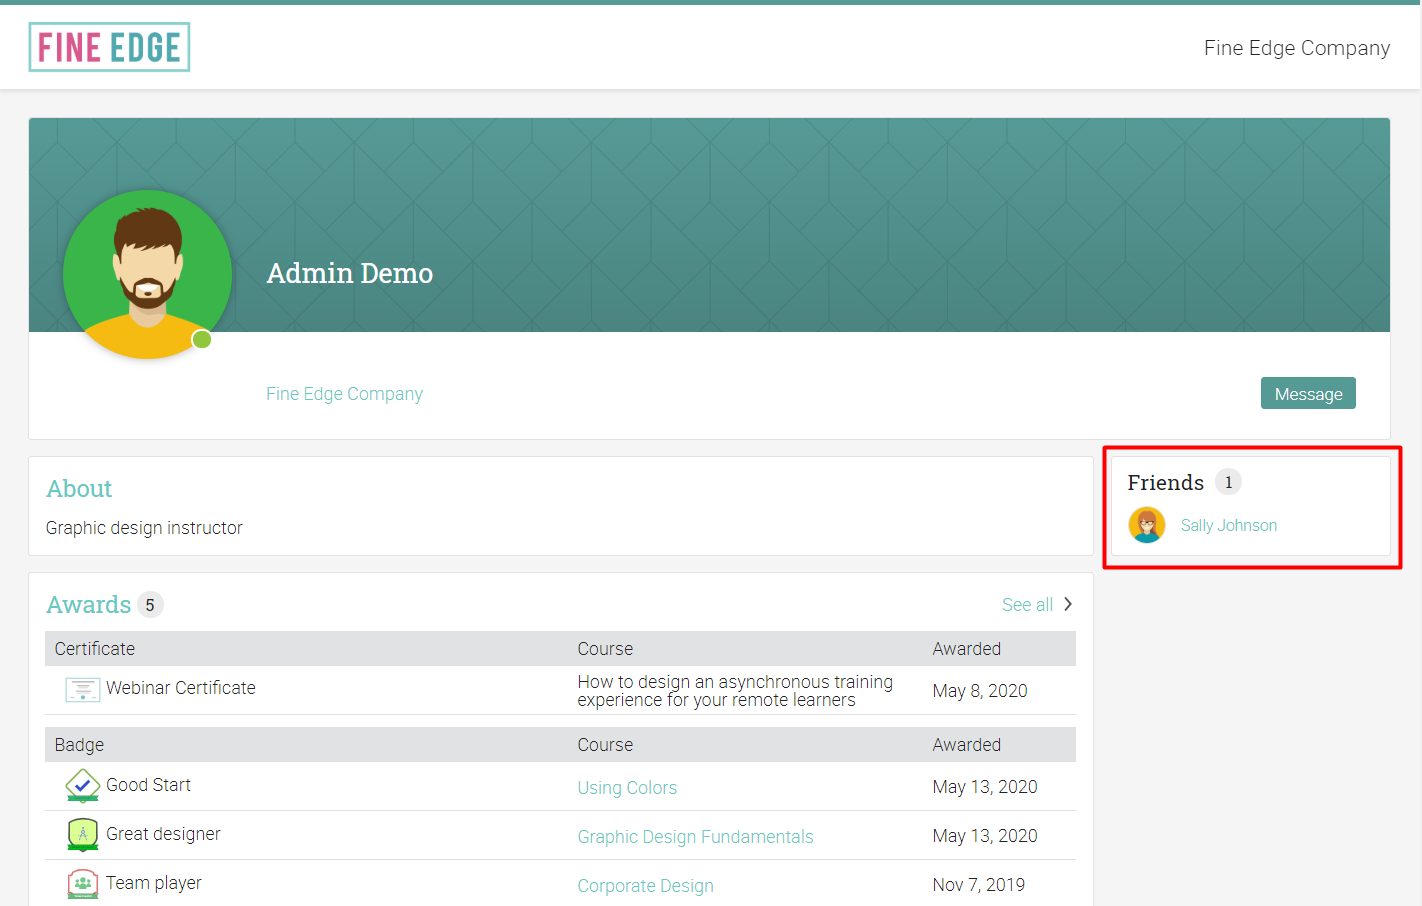
If friends are shown, a list of the friends that have public profile pages is listed in the right column with links to their public profiles.
Left bar
Navigating through the tabs on the left bar, users can see their purchases, awards, portfolio, and more. These tabs are different depending on the user type.
Settings
To change your account settings, for example, if you want to receive audio notifications, change your time zone, and select which items are displayed in the left navigation area, click the Settings tab.
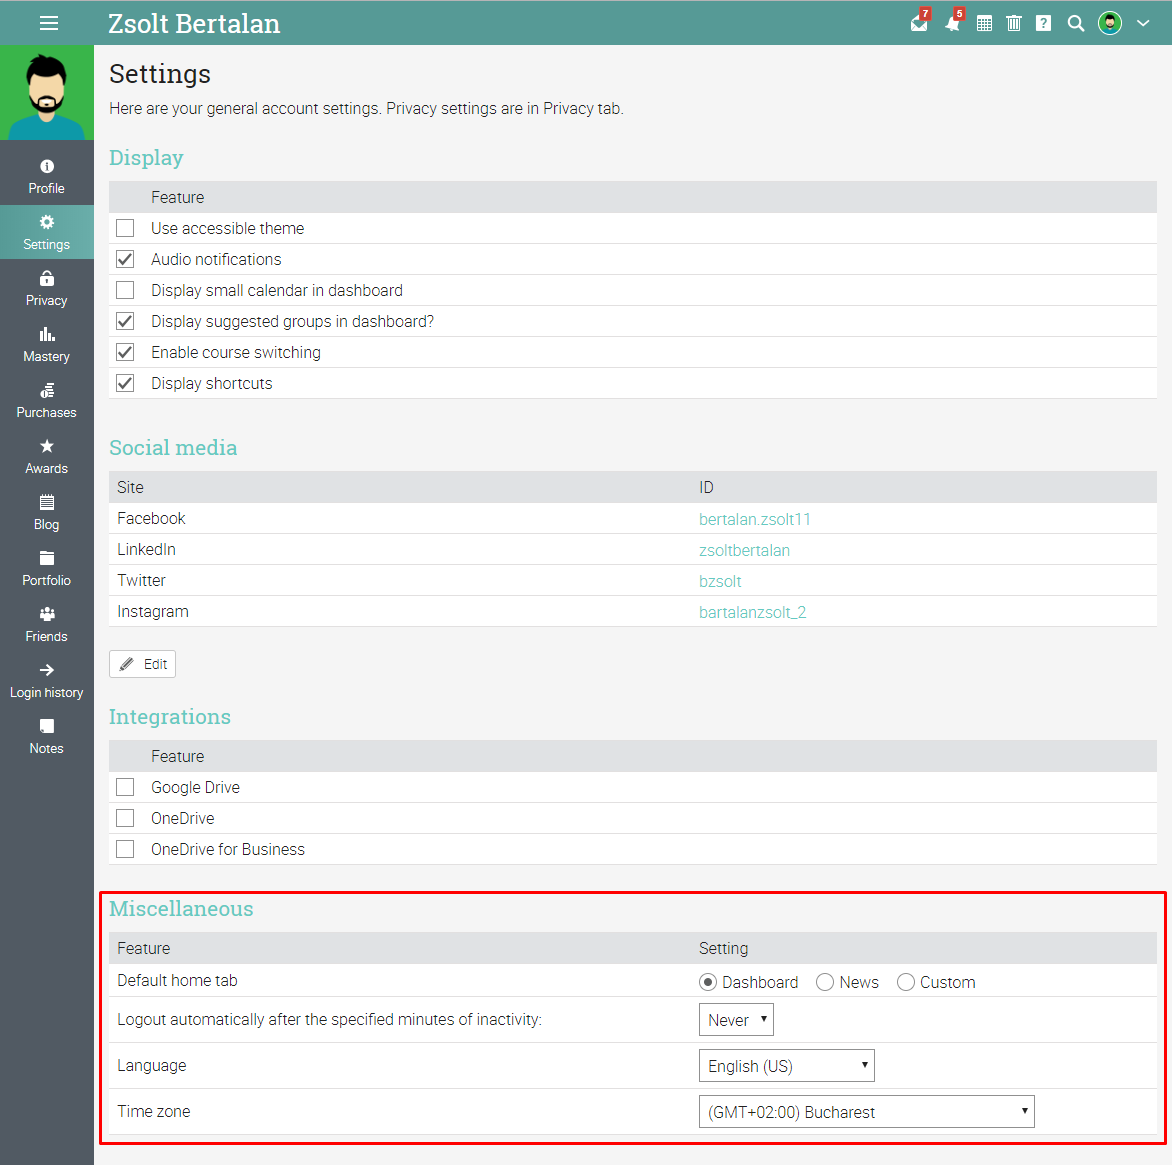
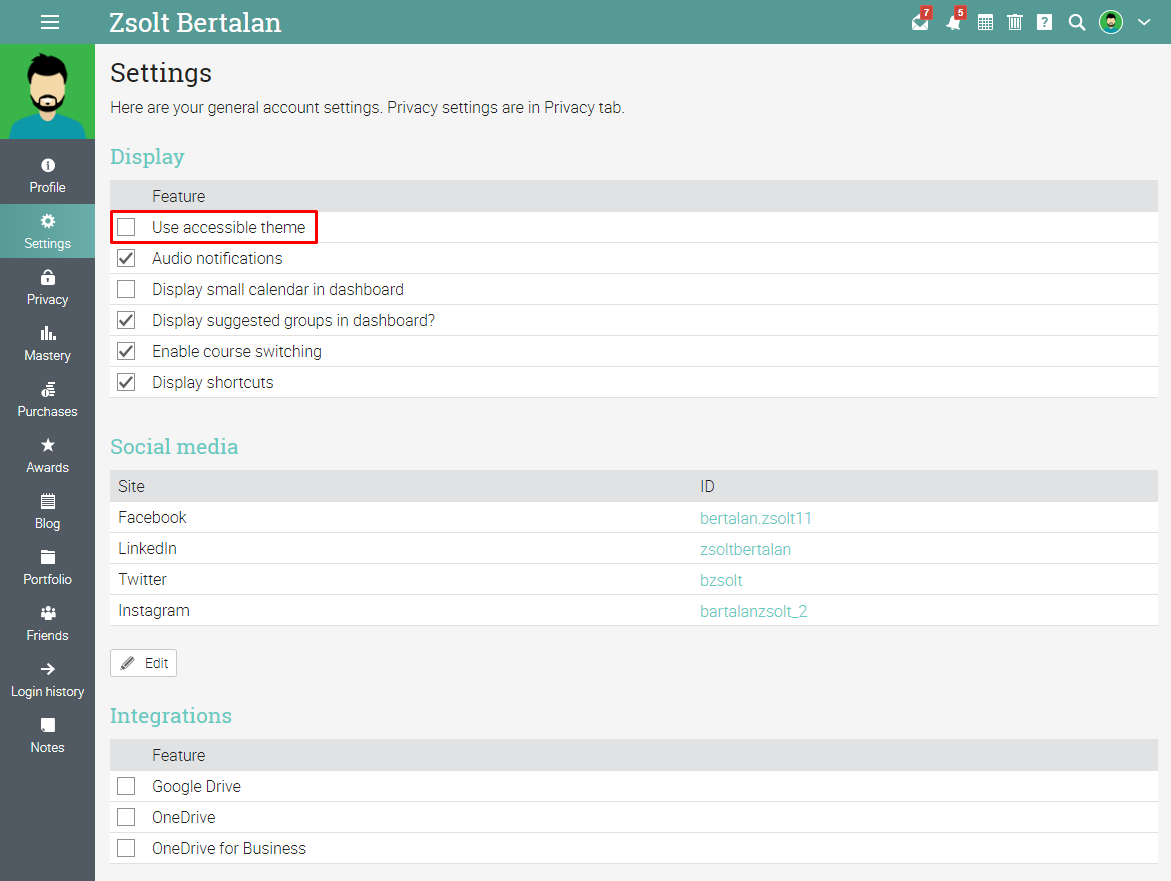
If the site admin allows it, you can choose to use the accessible theme for the portal.
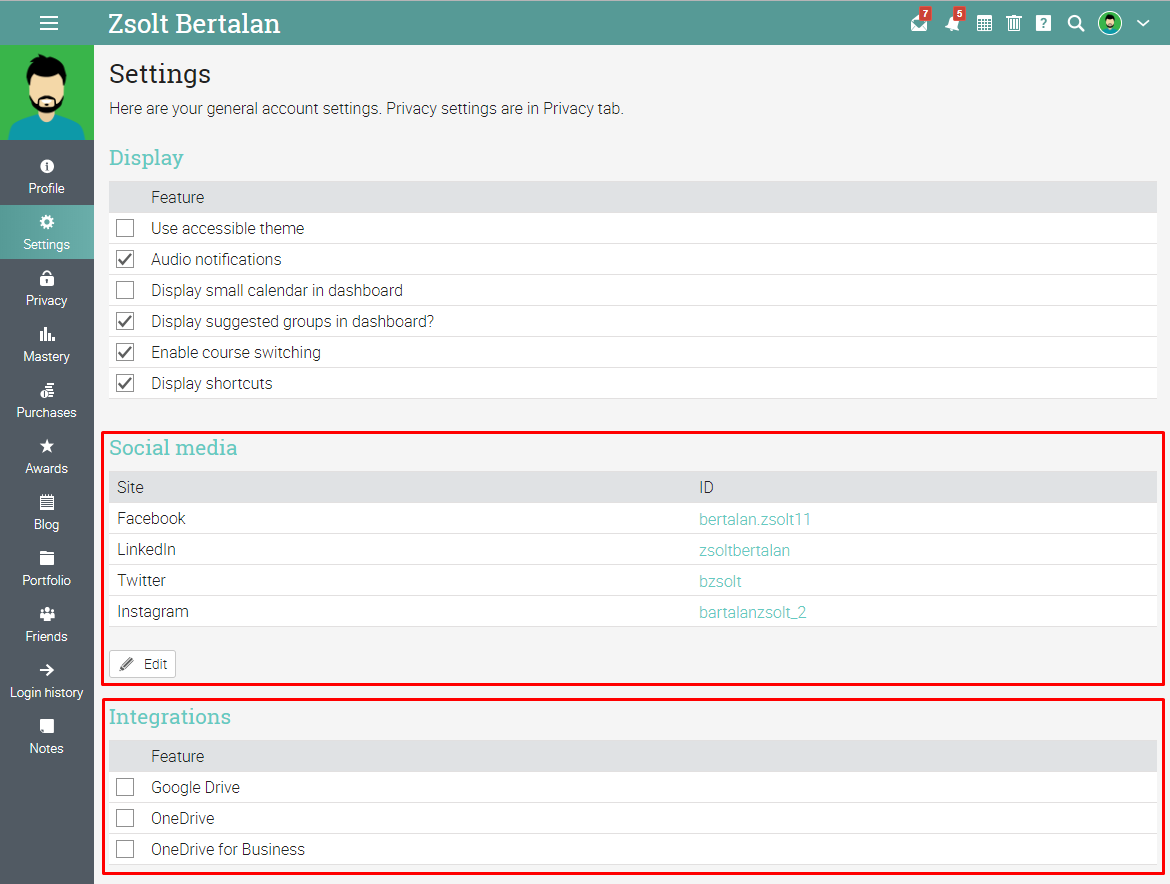
Here you can also enable account integration with OneDrive and GoogleDrive if the app has already been installed for your school by an administrator, and you can edit your social media IDs.
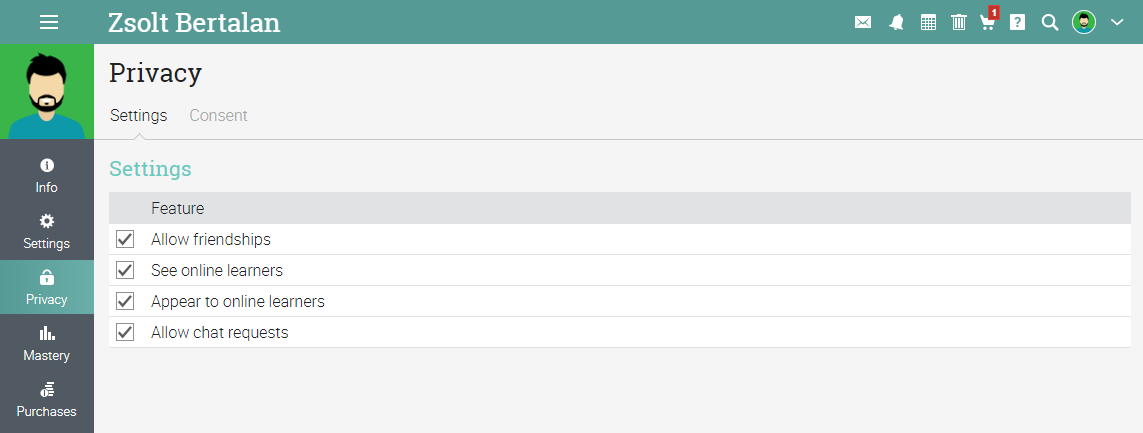
Privacy
In the Privacy tab, you can define to appear in searches, to see online learners, to allow friendships, and more.
Mastery
If the Mastery option is enabled, you can click the learner's Mastery tab in the left bar of their profile page to list their mastery for all the competencies associated with their courses.
.png?lmsauth=27f9ba80629a9e9d177e123ce1c93acb83d172aa)
Purchases
Here you can see a list of purchased courses. Users can see the details of their purchases, such as Price, the purchase date, and Status.
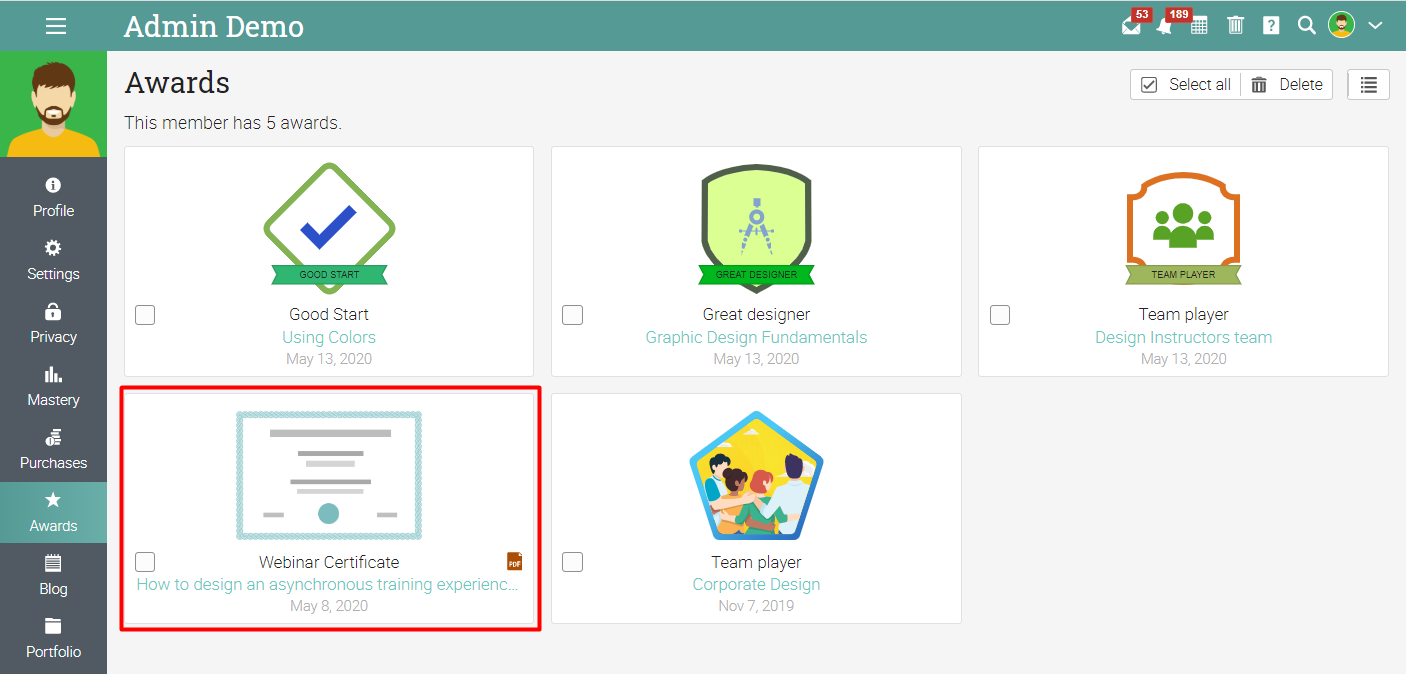
Awards
If the user was awarded Badges and Certificates, they will be listed here. Please note that user profiles only display the Awards tab if the user has at least one award. Certificates can be opened and listed by clicking on their icon.
Blog
If enabled from Admin/Policies, users can have a personal blog, and their posts will be listed here.
Portfolio
Here users can add items such as Files, HTML pages, Web resources, Tools, Folders, and Favorites resources to their own portfolio.
Mentors
If the user has mentors on the portal, they will be listed here.
Friends
If the user has friends on the portal, they will be listed here.
Login history
Here users can see their login history in the last 30 days. The list contains the login and logout time, the duration of the session, and the IP address. This option is available only for Instructors and Administrators.
Notes
Here Administrators can add notes that will be visible to other Administrators as well.
Right bar
Account
Under Account, users can see their account type. Here they can also see the date when they joined, the time since they were last online, and their login credentials. Only Administrators can see who added the account and have the possibility to sign in as the selected user, delete accounts, archive accounts, resend login instructions, see the LMS ID, and reset passwords.

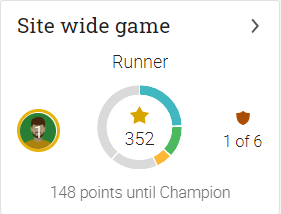
Site-wide game
If the user is in a site-wide game, here will be visible the acquired points, the number of badges, and ranking in the game.
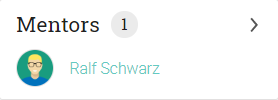
Mentors
This section lists the mentor(s) of the user.
Friends
Here users can see the list of their friends.
.png?lmsauth=3f68ee9e2ea924ce180ba49868d6a83989701d90)
Overview
The site has a private messaging system that does not require an email address. You can request copies of messages to be sent to your email and/or SMS address if you have one, and you can reply to these as well. Messages can be copied immediately or combined into a single 'digest' message and sent once a day.
To see your messages, click the icon in the top-right.

To read a message, click its subject.

You can reply to a message directly from the pop-up displayed by clicking 'Reply', entering your response, then click 'Send'. You can delete a message by clicking 'Delete'.

You can list all the messages you received by clicking 'See all'.

Here you can search your messages, you can mark them as read and you can delete them.

To see the content of the message, click on its subject.

Here you can also see all the recipients of the message.

To delete all your messages click the "Clear inbox" button.

To see all your sent messages, visit the Sent mail tab.

To ignore messages from a user, click their name (links to users appear in most places in the site such as a list of learners, instructors, and in the forums), then click 'Ignore messages'.

To send a message to someone, go to the Users catalog, hover over the user's name then click "Message".

You can message users from their profile pages as well by clicking the "Message" option.

You can also send a message to someone by clicking "New message" from the messages dropdown.

There is a "New message" button also in the inbox that you can click to compose a new message.

Write the name of the user(s) in the "To" field, optionally you can add users to the Cc and Bcc fields. To activate the Cc and Bcc fields, click the links in the upper-right corner of the pop-up.

You can use drag-and-drop to move users between To, Cc, and Bcc within the messaging popup.

Then write the message and click Send.

For convenience, URLs in messages are automatically converted into clickable links.

To send a message to a list of users, go to the People tab, select the users from a list, then click Message.

If you are using the Network feature, administrators of different sites within the network can exchange messages only if they are added as friends. To add users as friends, go to their profile page and click "Add friend".

After the friend request is accepted you can start sending messages by clicking the Message button on the user's profile page.

Context
If a user sends you a message from a particular course or you only have one course in common, the "From" field also displays a link to the associated course. This is very useful if you are an instructor who is receiving messages from lots of learners in many of your courses.

Configure
To configure Email integration, click 'Configure' at the top of your inbox.

To receive copies of messages to your email address, click 'All' to receive copies immediately or 'Digest' to have them combined into a single message and sent once a day.

If you haven't registered your email address, click the appropriate link to add it.

To receive copies of messages to your SMS address, click 'All'.

If you haven't registered your SMS address, click the appropriate link to add it.

Our system sends SMS messages via your provider's email gateway, and you can determine your SMS email address using this table. For example, if you use AT&T, your SMS address will be of the form [your phone number]@txt.att.net.
Signature
You can configure a signature that is automatically added at the bottom of every message/posting you send or reply to. To add your signature click Add under Signature.

A pop-up will open where you can enter your signature, which can include text and images as well.

After it is added, you can edit or you can delete the signature.

After you added your signature, whenever you create or respond to a message/posting/notification, the signature is automatically added to the editor so you don't have to type it each time.

Auto-translation
The messaging system is specially designed for use in an international environment, and always delivers messages in the native tongue of the reader. For example, if a Spanish user sends a message to an English user, the message is automatically translated from Spanish into English.
Using Zoom
Prerequisites
The Zoom web client allows joining a Zoom meeting or webinar without downloading any plugins or software. However, the web client has limited features and functions best on Google Chrome.
- Internet Explorer 10 or higher
- Microsoft Edge 38.14393.0.0 or higher
- Google Chrome 53.0.2785 or higher
- Safari 10.0.602.1.50 or higher
- Firefox 49.0 or higher
Features across browsers
| | Chrome | Firefox | Safari | Edge | Internet Explorer |
| Share video | ✓ | ✓ | ✓ | ✓ | |
| Share screen | ✓ | ✓ | | ✓ | |
| Join computer audio | ✓ | ** | ** | ✓ | |
| Join audio by phone | ✓ | ✓ | ✓ | ✓ | ✓ |
| Meeting host controls | ✓ | ✓ | ✓ | ✓ | ✓ |
| View shared video | ✓ | ✓ | ✓ | ✓ | |
| View shared screen | ✓ | ✓ | ✓ | ✓ | ✓ |
| Request remote control | ✓ | ✓ | ✓ | ✓ | ✓ |
| In-meeting chat | ✓ | ✓ | ✓ | ✓ | ✓ |
| Closed captioning | ✓ | ✓ | ✓ | ✓ | ✓ |
| Webinar Q&A | ✓ | ✓ | ✓ | ✓ | ✓ |
| Co-host | ✓ | ✓ | ✓ | ✓ | ✓ |
| Breakout Rooms | ✓ | ✓ | ✓ | ✓ | ✓ |
| Simultaneous screen share viewing and sharing | ✓ | ✓ | ✓ | ✓* | |
*Screensharing on Microsoft Edge requires Windows 10 Pro or Enterprise. It is not supported on Windows 10 Home. If you are running Windows 10 Home and need to share your screen, we recommend using Chrome or Firefox.
**Joining computer audio on Firefox and Safari is only available for webinar attendees.
Requirements for the Live Exams
The EEM Live Skills Demonstration will require that you have either a camera built into your computer, laptop and/or mobile device. Here are some recommendations depending on the type of device you have:
Desktop Computer/Laptop
- Built-in camera
- USB camera
Example - Logitech C920 (Make sure to get a camera with a built in microphone)
These cameras typically mount to your monitor out of the box, but you may want to consider a camera mount such as this one.
Mobile device (iPhone, Android, iPad, Tablet)
- Built in camera
- If you do not already have a stand, it is advisable to get a mobile device mount such as this:
- iPhone/Android - Click Here
- iPad/Tablet - Click Here
Joining the meeting or webinar
Important Note: If this is your first time using Zoom and/or you are about to attend one of your live exams, we recommend that you go to https://zoom.us/test to test your internet connection, audio and video. Please do this at least 15 minutes prior to your scheduled exam.
- Click the link you were provided in the email invite to join the meeting.
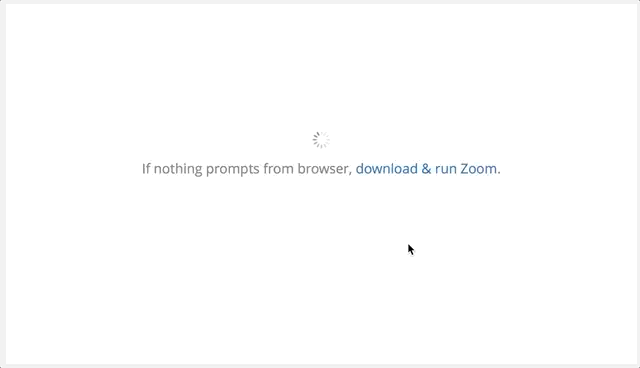
- An option Join from your Browser may appear automatically. If it does not, select download & run Zoom.
- The option Join from your Browser will appear.
- You will be prompted to enter your name.
- Click Join to be taken into the meeting.
Join audio
Once you have joined, you can join the audio by computer, dial in by telephone, or choose call me (if enabled for the host's account). Call Me and toll-free numbers require an audio conferencing plan.
1. Click Join Audio.
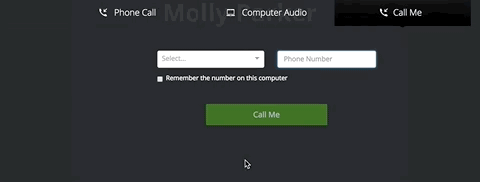
2. Click Phone Call, Computer Audio, or Call Me tab to choose your join method.

Phone Call: Follow the instructions on the screen for dialing in by phone.
Computer Audio: Click Join Audio By Computer. After joining computer audio, you can Mute/Unmute at the lower left corner or click on the ^ to select a different microphone and/or speaker.
Call Me: Choose the country of the phone you are calling from the drop down. Enter the phone number. Check Remember the number on this computer if you would like this number stored for future meetings. Click Call Me.
Viewing video
When joined into a Zoom meeting from the web client, you can view one participant's video in active speaker view or if the host spotlights a video. If multiple participants are sharing their video, you will only be able to see one at a time.
Navigating the Zoom Panel
Basic Navigation
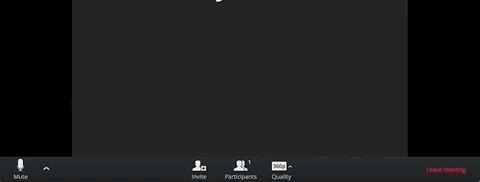
To Mute/Unmute
You click on the microphone icon located in the lower left-hand corner of your Zoom window. If muted, you will see a red line through the microphone, when unmuted you will not see the red line. As you will see on the image below, the audio is unmuted. You would mute yourself by clicking on the microphone icon.
To Start/Stop Video
You click on the camera icon located in the lower left-hand corner of your Zoom window. If the video is off, you will see a red line through the camera, when unmuted you will not see the red line. As you will see on the image below, the video is off. You start it again by clicking the camera icon.
To Leave the Meeting
You click on the leave meeting/end meeting RED letters on the lower right hand corner of the zoom window as shown in the image below.
To Chat with your Examiner via text
You click chat icon as seen in the image below. A chat window will appear for you to communicate with the examiner. This may be necessary if you are having audio challenges in either speaking to or hearing the examiner.

Camera Settings
To configure your camera:
You access your camera settings by clicking on the chevron located next to the camera icon as depicted in the image below.
From this pop-up menu (see image #1 below) you can select the camera you want to use with Zoom (if you have multiple cameras available on your system).
From this menu you can also select Video Settings, where there are multiple configuration options for you to choose. For the exams, you will want to make sure to uncheck the Mirror Video option (see image #2 below).

#1

#2
Audio Settings
To configure your audio:
You access your audio settings by clicking on the chevron located next to the microphone icon as depicted in the image below.
From this pop-up menu (see image #1 below) you can select the microphone you want to use with Zoom (if you have multiple microphones available on your system).
From this menu you can also select Audio Settings, where there are multiple configuration options for you to choose. For the exams, the default configuration is acceptable.
You can also test to ensure your speaker and microphone is working properly by clicking on the Test Speaker & Microphone menu option shown in the image below.

Requirements
It is extremely important that you establish an optimal viewing environment for your EEM Live Skills Demonstration Exam. All live exam sessions performed over Zoom will be recorded for quality assurance. The following are some key elements that you will need to consider:
- Make sure you have adequate lighting in the room.
- There must be no visible obstructions between you, your client and the examiner.
- Practice setting up your computer or mobile device to test your camera from the location where you plan to perform the demonstration. You must ensure that your examiner can see your full body as well as your test partners entire body.
- You must have clear microphone reception. Test your microphone for clear audio from where you plan to demonstrate on the client (use the Test Microphone & Speakers function in Zoom – for more details please see Using Zoom Controls During the Meeting section of this page under Audio Settings). You should hear clear audio playback when performing the test. If you do not have clear audio due to the distance of the device to yourself, you will need to purchase a compatible wireless headset/microphone combination for your device.
- Sometimes there may be camera angle challenges for your examiner to see you demonstrate exactly what is required. They may ask you to demonstrate a portion of the exam again at a different camera and/or body angle so they can see clearly. It is very helpful if you have a camera and/or device that is easily moveable in the event that a better angle is required.